Crispy Chicken Skin, because don’t act like this doesn’t look delicious

chicken

Ok readers, let’s have a little honest chat here – I believe that the kids call it “real talk” (I’m 45 going on 106, I say things like “the kids”).

We all love fried chicken.  It’s so delicious, the meat is so juicy, the buttermilk tenderizes the chicken and makes it so easy to chew.

Bullshit.

You want the skin.

You love the skin.

The crispy skin is the best.

Sometimes you get a full bucket of chicken just so you can peel the skin off, and throw perfectly good chicken flesh away just to devour the 12 secret spices and the fatty goodness of the skin.

And it’s ok.  We all love it, though I’d seek help for the last point.  Because it’s fatty and crispy and delicious when cooked up right.  So, no shame here.

This brings me to today’s recipe.  A few weeks back, I was making a recipe (which wasn’t good enough to make the cut for the blog) that called for skinless, bone-in chicken thighs.  And the only way to do that is to buy a pack of chicken thighs and skin them yourself.

So I’m skinning the thighs, and there is just a huge pile of skin when I’m done with it – almost a half-pound! (That picture would look disgusting, just plow through it)

I can’t throw all of that away.  What would the starving children think of me throwing that all away?  Would the pioneers approve of me wasting part of the animal?  Would the Pioneer Woman approve of me wasting part of the animal?  Hell no!!

(For those of you that think this sounds disgusting, ask yourself what pork rinds are?  Yep, pork skin.  And if that disgusts you, I don’t know why you’re still reading this blog.)

It took me no more than a minute to find an excellent recipe from Bon Appetit, which is incredibly simple – so simple that I can’t even justify using the HTML code to write it up.

First, preheat your oven to 350 degrees.  Then grab a couple baking sheets, and line one of them with parchment paper.

Now, your pile of gross looking skin that will turn into fatty crispy goodness.  Separate them and cut them into about 3 inch squares, or something close.  This isn’t a French Laundry dish, no one is going to look down on you if they end up looking like rectangles or trapezoids or Dom DeLuise.

Place the squartanglzoidLuises on the parchment paper, and flatten them out as best you can.  Then you shower them with salt and pepper.  A lot.  More than you think you need.  How you do it is up to you.  I prefer to throw it in the air like I just won the lottery and asked for the cash payout in quarters, so I can swim around in it and splash them around…or just sprinkle it on, whichever.

Once you’ve made it rain on the skin, cover it with another sheet of parchment paper, and put the other baking sheet on top of it so they don’t curl up into sad little balls.  Then put them in the oven for 1 hour.

SEMI-PRO-TIP: Open a window or two, or run the fan.  These get smoky and will leave a kind of unpleasant smell behind if you don’t.

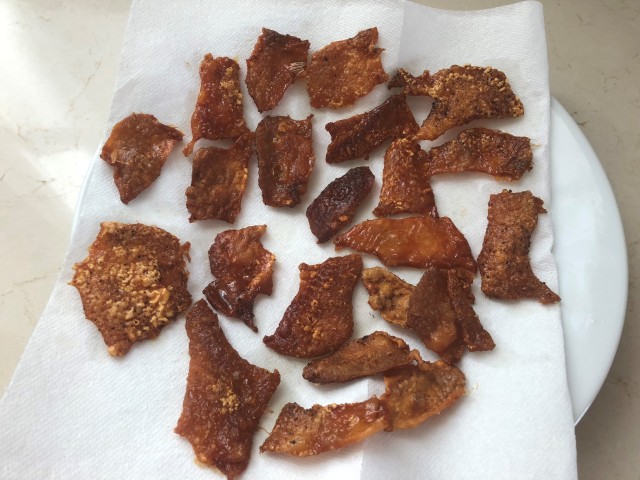
Once you pull them out of the oven, they will look browned and smell like absolute heaven.  Your best move is to let them sit for a bit to come to room temperature, and then snack on them over a long football Saturday or Sunday.  You probably won’t be able to resist, and just start eating them right there, which will burn your tongue, but you were going to do that on a slice of pizza anyways, so go for it.

Alternatively, you could chop them up into strips and use them as a garnish on a delicate chicken dish, as a texture enhancement.

Nah, you’re going to just eat them whole.  And that’s ok too.  I give you permission.

Miso Chicken Ramen, because you deserve more than just the packet

ramen

Several years ago, I was talking with one of my friends (yes, I have more than one…usually) about food, and they were telling me about how ramen noodles had become a big thing.  Here’s a brief recollection of how that went:


THEM: You really need to try this new place, they do some amazing ramen noodle bowls.

ME: Wait, ramen noodles?  That’s like 20 cents a packet, why would I pay good money to get that?  I haven’t eaten that since high school, one time I cut up a hot dog and put it in the bowl, I thought I was some serious hot shit.

THEM: No, it’s nothing like tha…

ME: HOT DOG RAMEN IS THE BEST!!!


Fast forward about a year.  I was in Honolulu on the tail end of a long vacation.  I was exhausted from multiple days of hiking and sightseeing.  I was suffering from a mild staph infection, for which I had to convince the doctor to prescribe me anti-biotics for, and then had to wait in line at the pharmacy behind a woman that was reading the riot act to the pharmacist because they didn’t have her prescription ready and they made her late to work which seemed odd since she was wearing a bikini top and short shorts.

So I had very little energy to do much of anything, but I seriously needed some food.  And I’d heard a lot about this ramen place down the street, so I figured I should go see what they were doing that was so much better than my elegant hot dog ramen.

When I got to the restaurant, I saw this sign outside of it:

IMG_2014

I suppose some of those are hot dog ramen in some sense, but that is NOT what I bargained for.  But, I was tired and didn’t feel like finding a new restaurant, so I went forward to try the non-porn ramen.

I ordered whatever bowl of noodles and broth, and got some fried things along with it.

IMG_2015

Obviously they have different ramen packets over there.  But the noodles were thick and chewy, and the broth was super-meaty and perfectly seasoned.  Again, different packets.

Once I got home, I decided that I had to try and make it myself.  But, every recipe for the broth required you to boil bones for 12 hours or throw some crazy ingredients in like East Asian Yak Tail.  And I couldn’t find dry Asian noodles that were close to what I had in Hawaii, and there is no way I was going to make them from scratch (I will never understand home cooks that make their own pasta.  Yeah, it’s going to be better than the dry stuff, but the joy/pain ratio of making you own over the dry is extremely low.  It’s like building your own watch instead of buying one from a store…if anyone still wears watches…)

As I increased my ramen knowledge, I found that you can actually have thin noodle good ramen, which was helpful.  And, after seeing a recipe on Tasty, I found that you can use the instant ramen noodles in good recipes – you just have to throw away the packet.  Which, sometimes is very good to use, but it’s just a MSG bomb, and we can do better than that.

I’m not going to lie, though.  This is not a quick and easy recipe.  It won’t take as long as making your own broth, but there are a lot of elements to it, and you’re going to have to use some good time managements skills.  But, you will be rewarded with a restaurant quality ramen bowl in a fraction of the time they take to cook theirs.

This is a basic template, you can add and subtract however you’d like.  Don’t like corn?  Throw some bamboo shoots in!  Have some extra mushrooms around?  Slice ’em up and toss them in at the end!  Want to go the extra mile and marinate your eggs?  Do it!


Miso Chicken Ramen

Makes 2 bowls

Ingredients

1 T butter

1 c corn kernels, fresh or frozen and thawed

2 eggs

2 c baby spinach

4 c chicken stock

2 cloves garlic, smashed

1 3 inch piece of ginger, sliced into small coins

3 scallions, chopped

2 boneless, skinless chicken breasts

2 T miso paste

2 blocks of instant ramen noodles, packets discarded

Additional scallions for garnish

Directions


Prepare an ice bath in a large bowl.

In a large Dutch oven or stockpot, add the chicken broth, garlic, ginger, and scallions.  Bring to a boil, then reduce to a simmer and cook for 30 minutes.  Add the chicken breasts, return the broth to a simmer, and cook for 20 minutes.  Remove the chicken and set aside.

While the broth is coming to a simmer and cooking, in a large skillet, melt the butter over medium high heat.  Add corn and saute until warmed through and just starting to brown.  Move to a bowl and set aside.

In a large saucepan, bring just enough water to cover two eggs to a boil.  Heat to high.  Once boiling, add eggs to the pot.  Boil for six minutes, then remove the eggs with a slotted spoon and carefully place in the ice bath.

Add spinach to boiling water and blanch until the spinach is just wilted.  Remove with a slotted spoon to a bowl and set aside.

Strain the broth of all solids, and return to the stockpot.  Stir in the miso paste, and simmer for a few minutes.

Shred the reserved chicken with two forks.

In a medium saucepan, cook the noodles according to the packet directions.  Drain the noodles and set aside.

Once the eggs are cool to the touch, remove the shells from the eggs.

To serve, add half the noodles to each bowl.  Ladle the broth over the noodles, and garnish with the spinach, corn, reserved scallions, and chicken.  Cut the eggs in half, and place on top of soup.

Bloody Mary marinated flank steak, because you can do better than Guy Fieri, and make a great drink at the same time

IMG_0310

Last weekend, my lady and I spent some time in New Orleans, and over the course of a few days we consumed somewhere between four and eleventy billion Bloody Marys.  And a few hurricanes.  And one of those hand grenade drinks that comes in those yard glasses that advertise it as the strongest drink on Bourbon Street which was not that strong oh my god I remember very little of that night after consuming it but the two are totally not correlated.

IMG_0137

We made it home in one piece, and I decided that I wanted to incorporate the Bloody Mary into something I cooked, without taking the easy way out and just making some peel-and-eat shrimp with cocktail sauce.

(Sidenote: a Bloody Mary is basically cocktail sauce, with tomato juice instead of ketchup.  But it’s cool, because cocktail sauce is delicious, and really, are peel-and-eat shrimp anything more than a sauce delivery vehicle?  I’ve had maybe three shrimp in my life that made me say, oh this doesn’t taste like watery rubber, I would eat these on their own.)

I figured for something like this, a flank steak would work best.  Chicken would be overwhelmed by the tomato mixture, and fish would break down if I left it to sit long enough for the marinade to penetrate it.  So I went to the internet to look up recipes and see if anyone has ever done this before, to at least make sure that no one has ever tried it and said, do not make this, it turned my steak into mush and the marinade exploded and left huge stains on my ceiling, and when we tried to sell our house we had to put in the description “pay no attention to the red stains in the kitchen from the great Bloody Mary incident of 2006.

One recipe came back.  And I clicked on it, and saw that the author was…

Guy Fieri.

Guy.

Fucking.

Fieri.

image-1-guy-fieri

No.

No, no, no, no, no.  We do not travel to Flavortown in this house, we make nothing that is righteous, and everything is in bounds and on the hook.

(BTW, I had to look all those expressions up.  Some of them.  Maybe.)

I did take a look at the method he used, and it lined up with what I had planned to do, so I went about creating my own recipe that would not only make a good marinade, but also the base for a great drink.  Not to toot my own horn, but I think I knocked it out of the park.

A few notes before I get to the recipe:

  • This is my recipe, any similarity to an existing recipe is completely coincidental, so there will be no attribution.
  • I served this with a simple salad and brown rice with lots of herbs – that recipe will come in a later mini-post.
  • You could use a bottled mix, and get pretty good results.  Don’t.  It doesn’t take more than a few minutes, you’ll use the ingredients in other recipes, and you can modify it as you like.
    • Caveat: if you’re going to use bottled lemon juice and not fresh squeezed, then go ahead and use the bottled.  It’s not going to taste nearly as good.

This does call for using a cast-iron skillet.  I know that scares a lot of people off, because they think it takes so much time to maintain it, and if you mess one thing up then it becomes totally useless.  I used to think so too, but it’s pretty easy – I bought one at a flea market a couple years ago, and after a little cleanup it’s slicker than a non-stick skillet.  Here’s a great primer on how to bring an old one back to life.

Bloody Mary Marinated Flank Steak

Serves 4, plus makes enough base for 2 Bloody Marys

Ingredients

1 1 1/2 lb flank or skirt steak

2 5.5 oz cans Spicy Hot V-8 juice

1 11.5 oz can tomato juice

2 1/2 T fresh squeezed lemon juice

2 T Worcestershire sauce

2 T prepared horseradish

1/2 T Sriracha

1/2 t soy sauce

1/4 t garlic powder

1/4 t salt

1/4 t black pepper

2 T canola oil

Directions

Place steak in a large Ziploc bag.  Mix remaining ingredients, except for oil.  Pour half of the mixture into the bag – save the rest for drinks.

Press as much air out of the bag as you can, then seal the bag.  Place in the refrigerator on top of a dish or paper towels, in case the bag leaks.  Marinate for 8 hours, flipping every couple hours to ensure even marinating.

Heat a large cast-iron skillet on high heat.  Add oil to the pan, and heat until smoking.  Place the steak into the pan fat side down, turn the heat down to medium-high, and cook for 3 minutes on each side until well browned on each side.

Remove the steak and place on a cutting board.  Let the steak rest for 10 minutes.  Slice thinly against the grain.