Roasted Brussels Sprouts with Sriracha and Honey, because you can turn a practical joke into something tasty

Let’s get this out of the way right now. Brussels sprouts are total bullshit. It’s a practical joke, played on us by Mother Nature.

People say that god must have been high when he made the panda. Well, he must have been on some serious LSD, while on a mushroom trip laced with some bad fentanyl, when he came up with these.

“Oh, hey, check this out. I made cabbage, and it’s the world’s shittiest vegetable. But, you know, I made it, so it’s awesome, but whatever. What if I made a bunch of baby cabbages and grew them on a tree trunk? Man, that’ll seriously fuck with their heads. Ooh, let me go work on the aardvark designs while I’m on a roll…”

(I like to envision god as The Dude.)

“Whoops, looks like I accidentally labeled them as Brussels sprouts, and not brussel. That’s awesome, now people are going to call them the wrong thing forever! Who’s going to call me on this, oh god you misspelled brussel, you really gotta change it. Haha, you just got turned into a dung beetle, how you like that? Someone get Gary Busey so we can find some more good coke.”

So the stuff is basically garbage. But, it also is good for you, and is probably high in folic acid, or vitamin T, or sodium flunkatate, so you should probably try and eat them so you won’t die an early death.

I watched a video from Not Another Cooking Show, where Stephen cooked Brussels sprouts. He swears by them, and used to make something very similar on his food truck, so I figured he knows how to make them edible.

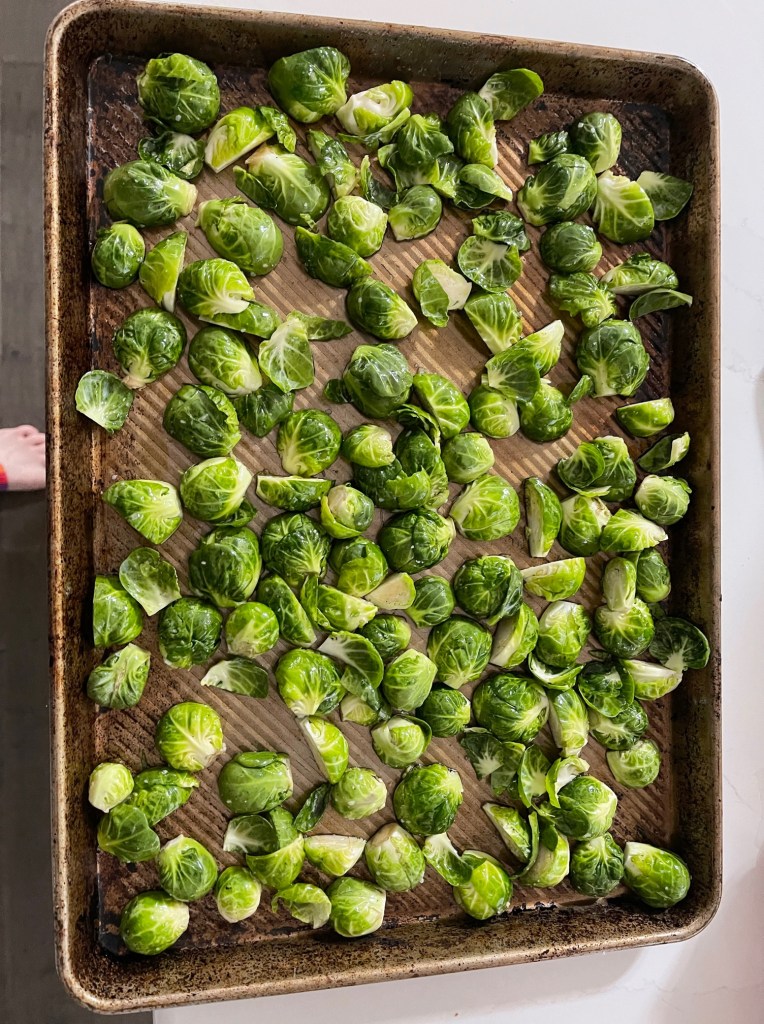
In order to make these abominations delectable, you’ve got to get some color on them. Which is a nice way of saying you need to burn them a bit. And in order to get the color, you need to maximize surface area. Which means that you need to cut them in half, and into quarters if they’re really big.

(How do you determine what is really big vs. normal? Hell, I don’t know, have them face off in a 64 sprout tournament to determine the biggest one? It’s like porn, you can’t explain it, but you know it when you see it.)

After you’ve cut them up, put them into a bowl and generously – and I mean generously – coat them with olive oil. They do not need to be thinking they’re Michael Phelps swimming the 400 meter IM through the oil, but they do need a good coating. Then hit them with a few pinches of salt and many grinds of pepper. Don’t be shy on the seasonings, they’re masking the evil tastes of the sprouts.

While you get the oven heating, get a sheet tray and dump those sprouts onto it – if it gets too crowded, use two trays, this is not the time to be jamming your food too tightly together. Then – and I cannot stress the importance of this enough – make sure that all of the sprouts are facing cut-side down. You want the flat sides to start getting color as soon as possible.

Once the oven is ready, chuck the sheet in the oven and let it get burning those sprouts for a good 15 minutes. Then pull the sheet out of the oven and take it to a counter to start flipping them.

The next point I cannot stress enough is that you should individually flip each Brussels sprout cut side up. This sounds like a royal pain, and maybe it is. But, this is how you show your food love. It needs to know that you care about it, that you want it to be everything you hope it will.

(Of course, you can just toss them around, or shake the tray a bit and see what happens, but the sprouts will know. Oh, they will know. And when you get that phone call many years from now, and the police tell you that your sprouts got drunk and lit bags of poo on the principal’s doorstep, or they shot up a school, or they started reading Ayn Rand…you’ll know why…)

After you flip them…

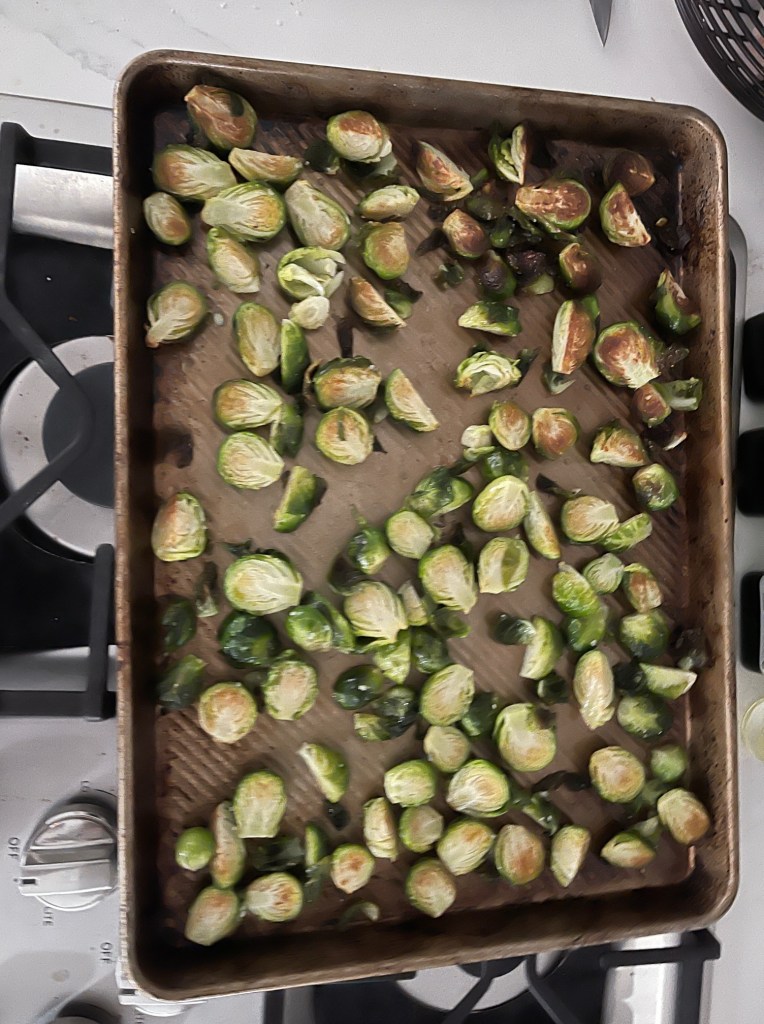
…you discover that your oven has some hot spots. But even the lighter ones are still starting to get some color on them. So chuck the tray back in the oven (giving it a 180 turn to account for the hot spots) for another 15 minutes (if they’re looking a little parched, a little more oil won’t hurt).

While they’re getting their second cook, you can make the sauce. I like using sriracha and honey, it’s a pretty simple combination that gets a lot of flavor out of the sprouts. I mix it in the same bowl I tossed the sprouts in, so there’s less cleanup afterwards.

After their second cook, the whole sprout has got some color on it.

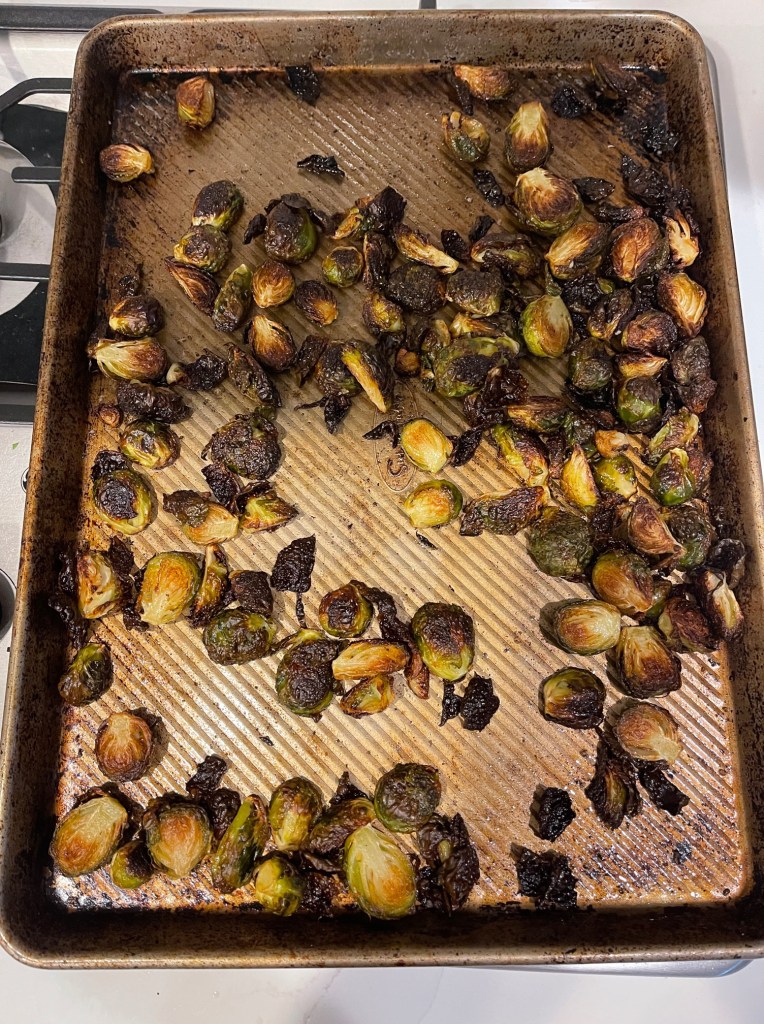
From here, you can just shake the pan around a bit to make sure that nothing stuck. Forget about showing them love anymore, they took the car and crashed it, and they didn’t take out the trash, and they keep playing that Spin Doctors song, they deserve their punishment.

Everything from here out is based on your liking. If you think they need some more cooking, throw the tray back in for another 10-15 minutes. If you like them softer, for some stupid reason, take them out now.

Whenever you’ve decided that they’re done, drop them into the bowl with the sauce. Coat them in the sauce, and relish the fact that you have done the unthinkable: you have taken the putrid and made it delicious.

Brussels Sprouts with Sriracha and Honey

Adapted from NOT ANOTHER COOKING SHOW

Serves 4

Ingredients

1 1/2 pounds Brussels sprouts, stems trimmed, dirty or nasty leaves removed, halved (trimmed if large)

1/4 c olive oil

Multiple generous pinches of salt

Several grinds of black pepper

1/4 c Sriracha

2 T honey

Directions

Preheat oven to 450 degrees F.

Place halved sprouts in a large bowl. Add oil, salt, and pepper. Mix well with your hands and ensure that the sprouts are well-coated with oil. Add more if needed.

Pour sprouts onto a sheet pans (if the tray is too crowded, use two pans), and turn all sprouts cut-side down.

Place pan in the oven for 15 minutes.

Remove pan and flip all sprouts to round-side down. Rotate the pan 180 degrees, and return to the oven for 15 minutes.

While the sprouts are cooking, add the Sriracha and honey to the large bowl, Stir to combine. Adjust the seasoning to your taste.

Remove pan from the oven after the 15 minutes have elapsed, and stir and shake the sprouts to keep them from sticking.

Return to the oven for 10-15 minutes, or until the sprouts are browned to your liking.

Remove pan, and add the cooked sprouts to the bowl with sauce. Toss to combine and serve.

Palestinian chicken, because this is way beyond pre-tay, pre-tay good

I have never fully embraced Curb Your Enthusiasm. Which is weird, because I loved Seinfeld, I like warped humor, and they had a character named Marty Funkhouser (rest in power, Bob Einstein). But it just never hit the mark with me.

What did hit the mark, however, was the episode with the Palestinian chicken – and granted even the episode has its own issues and doesn’t hold up as well as you’d like. But the chicken…it’s no joke, this stuff is really great.

(Setting up that this post will not be hijacked by any sort of pro/anti Israel/Palestine discussion, this is food, and if any of you little spazoids try, I know where you live and I’ve seen where you sleep, and I swear to everything holy that your mothers will cry when they see what I do to you.)

What makes it great is that it gets marinated in yogurt and spices for 24 hours. You would think that the yogurt would make the skin soft and flabby, but it’s the complete opposite. It gets crispy and browned, almost blackened. And the yogurt helps tenderize the meat too, because…science…

First thing you need to do is to get yourself a whole chicken. A normal sized one, about 4 pounds or so, not the ginormous ones that would have qualified for small turkeys a few years ago. I highly recommend getting an air chilled one if that’s an option.

One you have your not bio-generated monster chicken, you’re going to spatchcock it. You might remember that we covered this in a previous post, from like forever ago. But, if you haven’t been with the blog before last week, here’s a quick review of how to do it, brought to you by the smooth voice of Chef John.

Now, could you just use a cut up chicken, or random chicken parts, or the crab from The Little Mermaid? Sure, I guess.

Should you?

Spatchcocking it is going to keep everything flat and get maximum browning and minimum time cooking. And you will know that this was once an animal, and it died for you…after someone at a meatpacking plant killed it for you…

For the marinade, you’re just going to mix the yogurt with shallots and a few herbs and spices. The recipe calls for sumac. However, our local market didn’t have any, and I kept getting a 404 error every time I went to sumac-r-us.com, so I subbed in some lemon pepper and it turned out just fine.

Once you’ve got all the marinade mixed together, get yourself a big Ziploc bag, toss the chicken in there, and cover it with your yogurt goodness.

(Awkward pause)

Then rub the yogurt all over the chicken, making sure you cover every inch of the yeah this isn’t making it any better just toss it around in the yogur oh for crying out loud just close the bag and put it into the fridge.

Now that the yogurt bird is resting in the fridge, let’s talk toum. Never heard of toum? Neither had I! It’s essentially an eggless garlic mayo, which you will want to spread on everything you eat for the rest of your life.

Could you just take a jar of mayonnaise and mix in some jarred minced garlic? I guess.

Should you?

Yes, it’s going to be a pain in the ass to crush all those garlic cloves, and the peels are going to be sticky, and your hands are going to reek of garlic, and no one will want to touch you even though that was probably the case before you started crushing garlic anyways but go ahead and use the garlic as an excuse if it makes you feel better. But look at what that’s going to yield you.

And then you’re not going to get to watch it turn into this lovely garlic paste…

…and see it turned into this huge mound of garlic spread goodness.

So, do yourself a favor and take the time to make this yourself. The chicken isn’t going anywhere…and if it does…you have other issues you’re going to need to deal with.

The next day, after your chicken is done soaking in the marinade, pull it out of the fridge. Lay some foil on top of a roasting pan or baking sheet (you do NOT want to be scraping this off the bottom of a pan) and lay your chicken flat over it. Pop it in the oven, and when it’s done let it rest before you cut into it. It’s going to be hotter than hell, and you want all the bird juices to reabsorb into the meat and not fly out of it.

Once your bird is rested, cut off a piece of it, throw it on a plate with some toum, and dig in.

Palestinian Chicken with Toum

from Binging With Babish

Serves 4

Ingredients

1 whole chicken, about 4 pounds

1 cup yogurt

2 shallots, finely diced

Zest of 1 lemon

Juice of 1/2 lemon

1 t sumac (lemon pepper can be substituted)

1/2 t ground cardamom

1 bunch fresh dill, chopped (no dry dill)

1 T olive oil

2 heads garlic, peeled

1 cup canola, or other neutral oil

1/4 c lemon juice

Directions

In a medium bowl, combine the yogurt, shallots, lemon zest, juice of 1/2 lemon, cardamom, sumac, dill, olive oil, salt and pepper.

Spatchcock the chicken, and place it in a gallon sized storage bag.  Pour contents from the yogurt bowl into the bag, remove as much excess air from the bag, and seal.  Rub the yogurt mixture all over the chicken to ensure it is completely coated.

Place the bag in the refrigerator, and allow it to marinate overnight.

The next day, preheat the oven to 450 degrees F.

Place a layer of foil over the bottom of a roasting pan or sheet tray.  Remove chicken from bag, and lay on top of the foil (no need to remove the excess marinade).

Roast chicken for 45-55 minutes.

While the chicken is cooking, peel the garlic cloves and place in the bowl of a food processor.  Start the processor, and pulse until the garlic forms a smooth paste.

Once a paste is formed, slowly drizzle in 1/2 cup of the canola oil.  Stop the processor and allow it to rest for a few seconds.  Then slowly drizzle in the 1/4 cup of lemon juice, and allow to rest for a few seconds.  Slowly drizzle in the remaining oil, until the mixture forms into a smooth paste.

Once chicken is finished cooking, remove from the oven and rest for at least 10 minutes.  Carve chicken and serve with toum.

Matzo Ball Soup, because you need some Jewish soul food in your life

I remember when I was growing up, my family would go over to my great aunt’s house for holiday dinners. And for occasional weekend dinners. And random Friday night gatherings. They threw a lot of events, because at that age I suppose you don’t have much else to do.

Anyways, my grandmother lived right up the hill from my great aunt – literally right up the hill. Their houses were pretty much back to back, and you walk down a 50 foot hill and you’re at the house. So she would bring some food as well. And she made matzo ball soup, with the largest matzo balls I have ever seen. Like, the size of softballs.

And they’d serve them in these average sized bowls, so the balls would engulf the bowl, and there’d be a little bit of soup in it, and a little piece of carrot or celery that wondered why they even bothered to put it in the bowl.

Were they good? Hell if I remember! They were giant balls, what else did you need to know?

Flash forward about 20 years. My friends were having a soup night, and I decided that it was time to take a shot at making my own version of matzo ball soup.. So I did the slightest bit of research, and came to the realization…

…her matzo balls probably sucked.

Let’s step back for a minute, for those of you that aren’t familiar with this goodness. Matzo ball soup is essentially Jewish chicken and dumplings. The balls are pretty close to the same as dumplings, except you use matzo meal instead of flour. And matzo meal is made from ground-up matzos, which are flavorless dry crackers. That doesn’t sound terribly appealing, but neither does flour, and you’re going to make some very good things out of this.

Now, there are two types of matzo balls: floaters and sinkers. Floaters are pillowy, soft, tender balls that will mostly sit on top of the broth and absorb all the flavors of the soup.

Sinkers are for people that have no taste buds, like horrible things, and probably root for Ohio State…I mean, they are flavorless blobs that sink to the bottom of the bowl.

Most likely, my grandmother’s matzo balls were sinkers. I probably learned more about my family with this piece of information than I would get from spending 20 hours on Ancestry.com.

So, because we here on this blog like things that taste good, we’re going to work on making some floaters. Making the batter is pretty easy. You just mix some matzo meal, eggs, seltzer water (the key ingredient to make them floaters), melted butter (if you have some spare schmaltz laying around, this would be the time to use it), salt, and pepper. Be generous with the salt, matzo meal is seriously bland.

Once you’ve got it mixed together (make sure there aren’t any pockets of dry matzo meal just hanging out together), put it in the refrigerator to rest for about 30 minutes or so. This is essential, all the ingredients need to have time to get to know each other, talk about the latest episode of Ted Lasso, debate the merits of Nate making decisions over Coach Beard, stuff like that.

While that’s resting, go get your biggest pot and fill it up with a boatload of chicken broth, and start bringing that to a boil. Definitely splurge for the organic stuff if you can, it does make for a better soup (though if you have some homemade broth, you are not going to find a better purpose for it).

Once your batter is rested and can give you the plusses and minuses of using a 4-4-2 vs. 4-2-3-1 formation, pull it out of the fridge and bring it next to your kitchen sink, along with a plate to place your matzo balls onto. Why near the sink? Because the ball mixture is super sticky, and you’re going to need to wet your hands every few balls so it doesn’t stick to your hands.

You want to make these relatively small, no bigger than a golf ball. They’re going to puff up when they cook, so don’t make them too big. So just grab a little piece, roll it around in your moist hands, say ohhh, I can’t wait to put you in my mouth, acknowledge that that was just weird, and then put the ball on the plate.

By the time you’ve got your balls made, your broth should be at a boil. Drop those balls in one at a time, maybe make a high-pitched scream after each one, saying NOOOO I STILL HAVE SO MUCH TO LIVE FOR!!! Once they’re in, lower the temperature to a simmer. I like keeping the lid on so the top-facing side stays moist – if you do that, make sure you get the temperature pretty low, because it can come to a boil pretty easily.

Now, some people will argue with you and say that the balls should be cooked in water and not broth, because you want to taste the balls separately from the broth. Which, I say, of course you should do that! What hasn’t ever tasted better when cooked in water than in broth? And I get to dirty up another pot? Where do I sign up for this dipshittery?!?!

While the balls are cooking, get yourself one of those rotisserie chickens and shred it up into little bits. I don’t know if it’s the brine/spices they cook them in, or the texture of it, but it really adds something to the dish.

After the balls are done cooking (which you’ve flipped once during their 30 minute bath), get those balls out of there and back onto that plate.

Remember how I said they were going to plump up? Check these fat fuckers out! If I knew how to do cool photoshop stuff I’d be making a How It Started/How It’s Going meme for this!

From here, you’ve got choices. Do you want to add carrots, celery, onions, Ivermectin to your broth? This would be the time to cut some up and get them cooking in the broth. Cut them in small enough pieces that they’ll cook in 10-15 minutes or so – you’ve put enough effort into the soup, you don’t want to wait too much longer to eat it, and no one gives a fuck about the vegetables, so get it done quick. Then drop the shredded chicken in there and cook it just long enough to heat it through and get it to release those sweet spices.

All set now? Load up a bowl with some soup and chicken, drop a few balls in there, and kick back and enjoy. You’ve got good taste, and those sinker lovers can go suck it.

Matzo Ball Soup

Serves 4-6 bowls

Ingredients

1 cup matzo meal

4 large eggs

1/4 cup melted butter or oil

1/4 cup seltzer water

1 teaspoon salt

Several grinds of black pepper

3-4 quarts of organic chicken broth

1 grocery store rotisserie chicken, skinned and shredded

Directions

In a large bowl, beat the eggs until the yolks and whites are combined.

Mix in the matzo meal, melted butter, seltzer water, salt, and pepper. Stir until there are no pockets of dry matzo meal.

Refrigerate the mixture for 30 minutes.

In a large stockpot, add the chicken broth. Bring to a boil.

After 30 minutes, remove the bowl from the refrigerator, and place by a sink. Place a large plate by the bowl.

Wet your hands under cold water, grab a golf ball sized piece of the mixture or smaller, and roll it into a ball shape. Place the ball onto the plate, and repeat.

When the broth reaches a boil, add the matzo balls to the pot one at a time.

Reduce the heat to low, cover the pot, and cook for 15 minutes. Check after a couple minutes to make sure the broth does not boil over.

After 15 minutes, remove the lid, flip the matzo balls, and cook for another 15 minutes.

Remove the balls with a slotted spoon and place on a plate.

Return the broth to a simmer. If desired, add vegetables and cook until tender.

Add shredded chicken to the simmering broth. Simmer until chicken is warmed through.

Return matzo balls back to the pot. Simmer for a minute to reheat the matzo balls.

Serve.