Cioppino, because no one should ever keep you from having two soups

Even in my younger days, I would have been consider a foodie. I just loved trying new and unique foods, so long as they didn’t contain lettuce…or broccoli…or cauliflower…or ok I just liked new meat stuffs I guess.

Anyways, I think it was my junior year of high school, when my dad and I decided to have a father/son weekend in Chicago. And when I say that we decided, I mean that he said we were going to do it, and I decided that I really liked him paying for my car, and he was a pretty good guy so it was cool with me.

That Saturday, I remember we went to a Cubs game (where my dad decided that he was only going to pay the ticket scalper $24 for the tickets we had agreed to pay $25 for, which did not make the man happy and was the first time I genuinely feared for my life, all over $1 less than what Lane Meyer owed the paperboy).

After the near death baseball game, we went to Nick’s Fishmarket for dinner. Really nice seafood place, white tablecloths, close to fine dining. I’m looking through the menu, and I see this thing called see-oh-pin-oh, which looked absolutely delicious. Mussels? Never had them, but they sound cool. Shrimp? Sure. Fish? Yes please. Tomato? Sure ok, price you have to pay to get the seafoods.

The waiter comes to take our order, we’ll call him Raul.

(Why Raul? Well, my dad called every waiter Raul, which was amusing but also slightly annoying, because not every waiter was Mexican/Spanish, but it was the late 80’s so being culturally insensitive wasn’t a big deal.)

So Raul asks what I would like, and I say cioppino, which thankfully my dad had taught me how to pronounce correctly. And then he asks what kind of dressing would I like on my salad. This posed a problem for me, because salads have lettuce, and lettuce is the work of the devil. So I went to my go to backup plan, and asked if I could substitute soup for the salad.

At that point, Raul looked at me with horror, like I had done something awful, like infected the restaurant with a plague, or wore a White Sox hat on the North Side of Chicago, or made some awful racist statement (strangely, cultural insensitivity wasn’t a big deal, but overt racism was, it was a weird time).

I wondered what my offense was, but then my dad chimed in and said “you’re basically having two soups if you do that”. Apparently he and Raul were in on the conspiracy together. I didn’t see what was wrong with that, but I guess in fine dining it’s a sin to have two soups. So sadly, I missed out on the clam chowder.

(Nick’s closed down in 2009. I think Raul had something to do with it.)

(My dad also died the next year. I can’t say for certain that Raul had something to do with it, but I can’t say that he didn’t.)

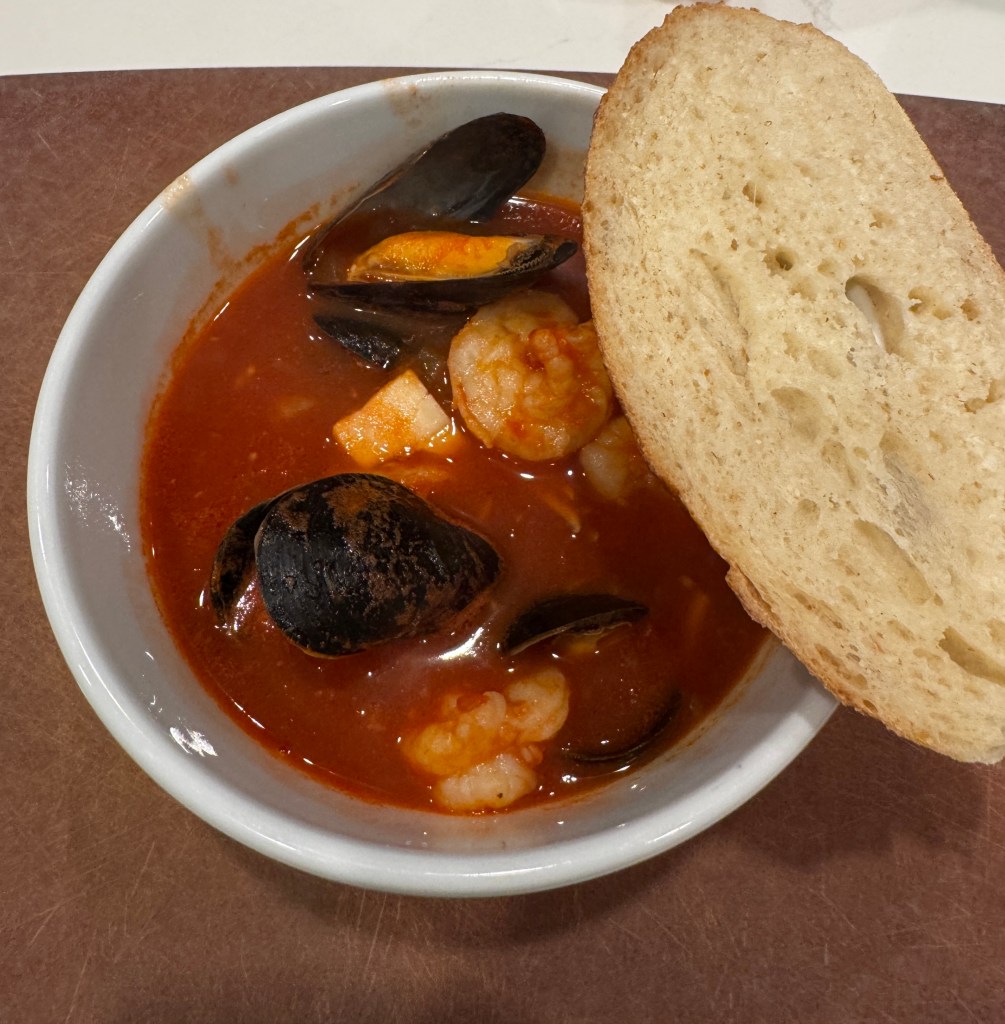
Wow, ok that was a long journey I didn’t expect to take 2 1/2 hours ago when I started writing this, but we had fun, right? Anyways, if you haven’t had cioppino before, it’s an absolutely delicious stew of fish and other seafood, in a tomato broth/sauce that pretty much begs to be sopped up with hunks of crusty bread. I mean, it doesn’t actually beg for it, GMO foods haven’t mastered speech yet…but I’m sure it’s coming.

If you’re going to make cioppino, there’s a few things to keep in mind.

  • First, this is usually not a budget friendly dish. We caught a good time with sales on shrimp and mussels, and we had some frozen seafood from Sea2Table, who is not a sponsor of this blog…but they could be…
  • That said, the types of seafood you can use in this is completely flexible. The only thing I would say you really should have is shrimp, but anything else is fair game.
    • Except for Patrick the Starfish. Speaking of Patrick…
  • A good broth is essential for this dish. No boxed seafood broth here – you wouldn’t want that anyways, I’ve never had a boxed seafood broth that didn’t taste like the dregs of Bikini Bottom.
  • The vegetables need to be cut very finely. You don’t want chunks of veggies distracting you from the deliciousness of the seafoods and broths.

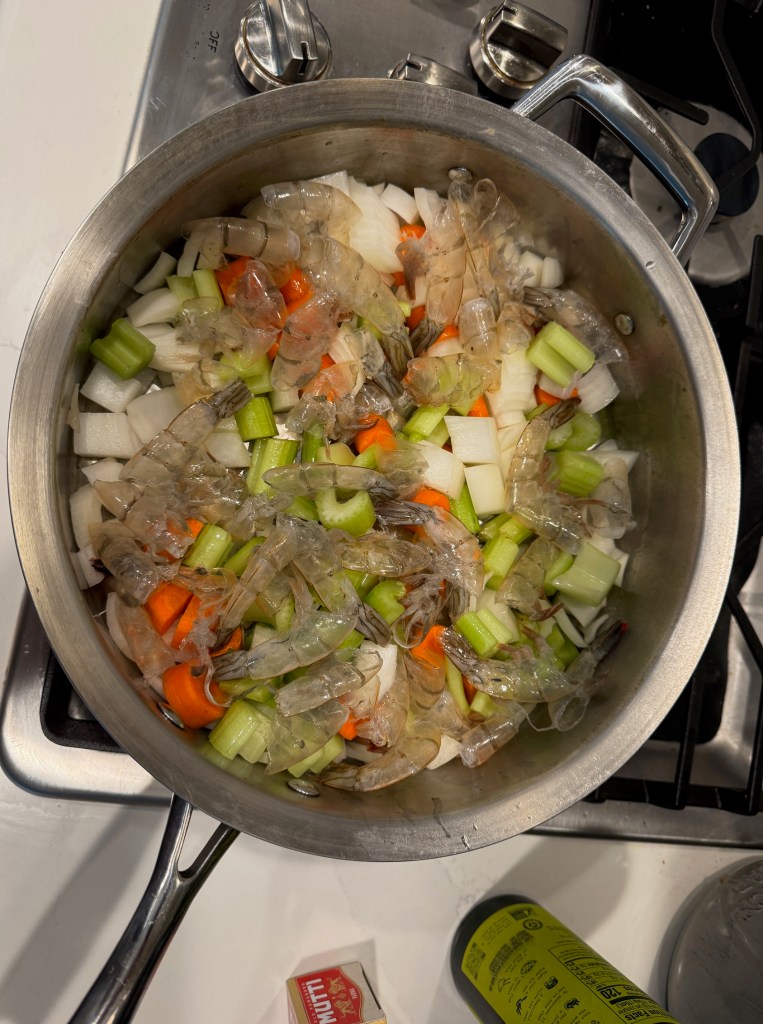
So the first thing you’ll want to do is shell and devein the shrimps. The stuff in the vein is nasty, it’s a bit of a pain but take the time to cut it out. But, don’t discard the shells, because they’re going to help make the broth.

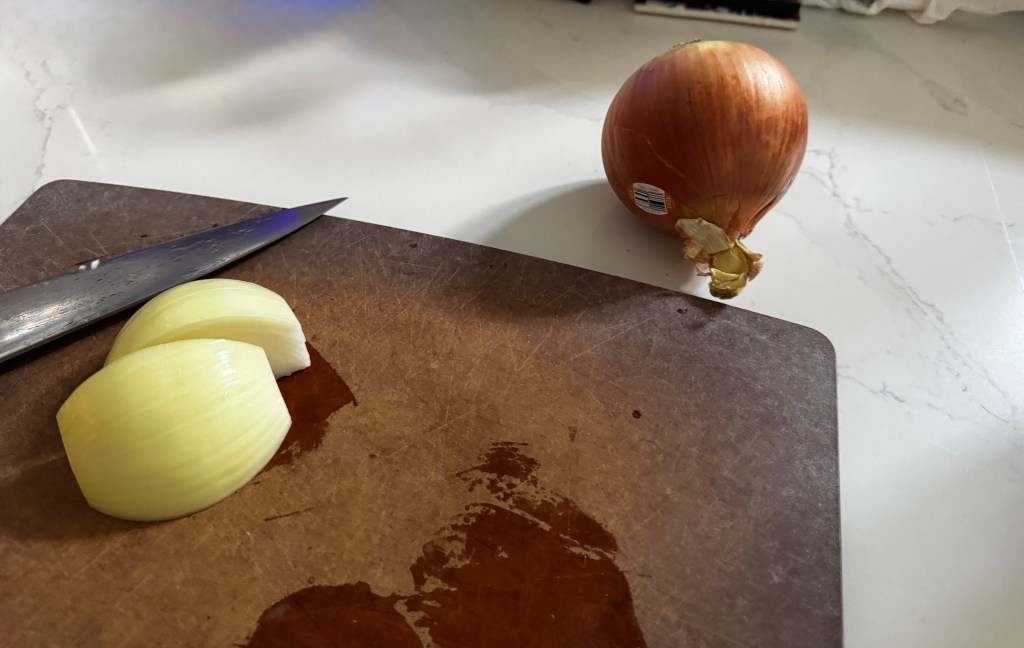
Now, get those shrimps in to the fridge, they’ll need to chill for a while. Meanwhile, grab an onion, a few celery stalks, and a couple carrots, and rough chop them. Wash the carrots, you don’t need to peel them for a broth.

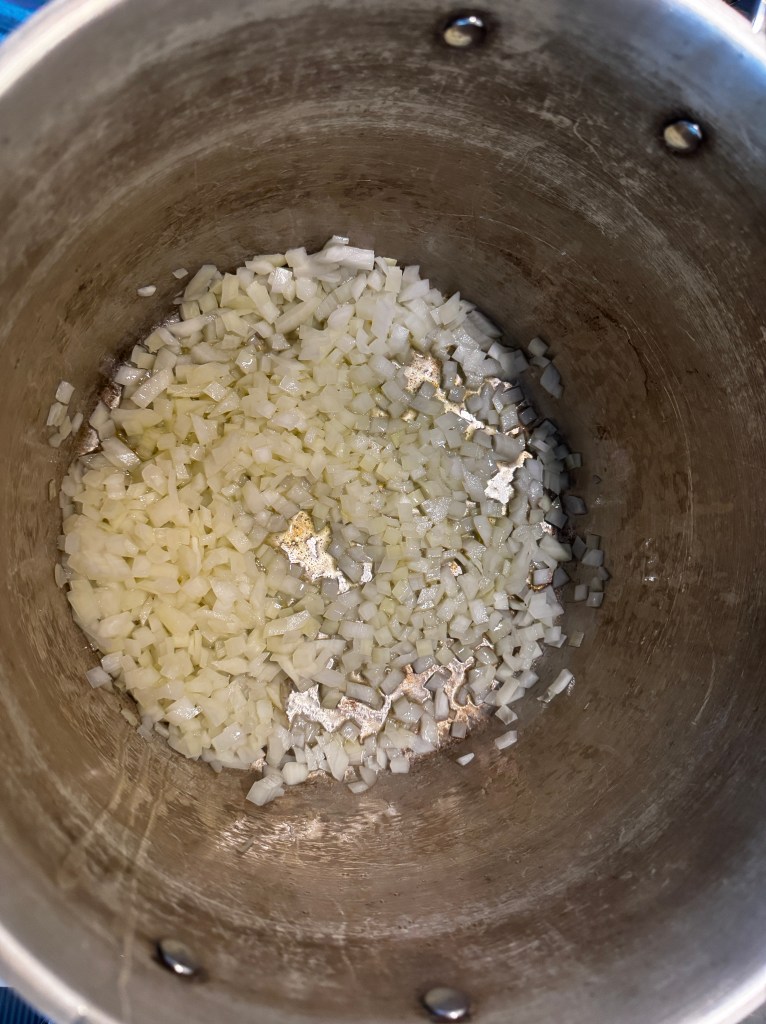
Once those are prepped, get yourself a big saute pan or pot, and heat a couple glugs (technical term) of olive oil over medium heat. Then, dump in the shrimp shells and veggies, and cook them for about 15 minutes.

Give them a regular stir every minute or so. If the bottom looks like it’s getting a little too brown, throw a little water in the pan to scrape it up and cool things down just a bit. I would have had a picture of what this should look like after 15 minutes, but one of our dogs decided to be adorable, and you’d rather see a picture of her, right?

Once the veggies are softened and browned a little, and the shrimp shells are pink and cooked, it’s time to add the rest of the ingredients to the broth party.

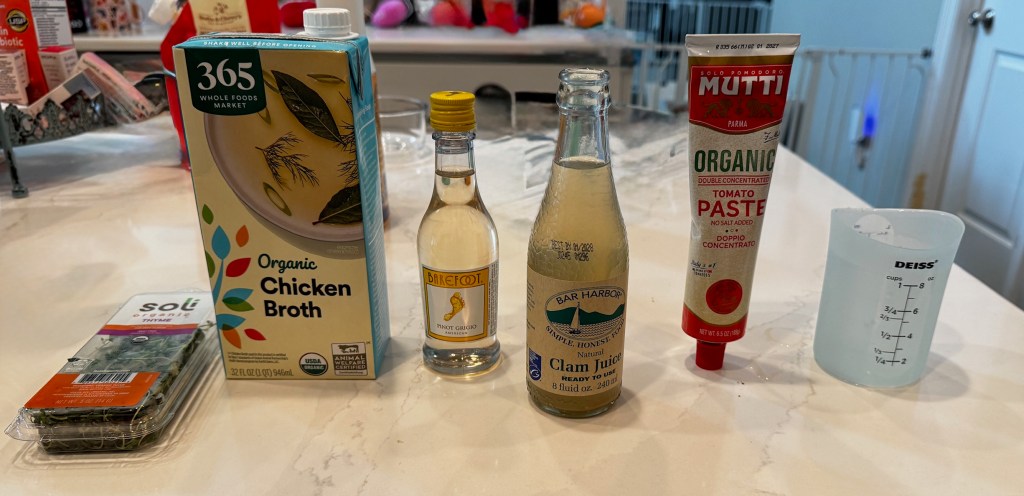
Here you’re going to add:

  • A quart box of chicken broth (I know I said no boxed seafood broth, but boxed chicken broth is perfectly acceptable)
  • A bottle of clam juice
  • A mini bottle of dry white wine (if you don’t believe in mini bottles of wine, 3/4 of a cup is about what it comes out to)
  • A few big squeezes of tomato paste
  • A cup of water
  • And a bunch of thyme sprigs

Get those into the pan, bring everything up to a boil, then reduce the heat to a simmer, and let that go for an hour. This broth should be super flavorful, bright, shrimpy/fishy/tomato-y. Which is good, because it’s going to be the main flavor base for the dish.

When it’s done, strain the broth through a fine mesh strainer, and push against the veggies and shells to get every last bit of flavor out of them. That’s right, you had flavor, and these solids are trying to steal it from you, and you must smash them into submission.

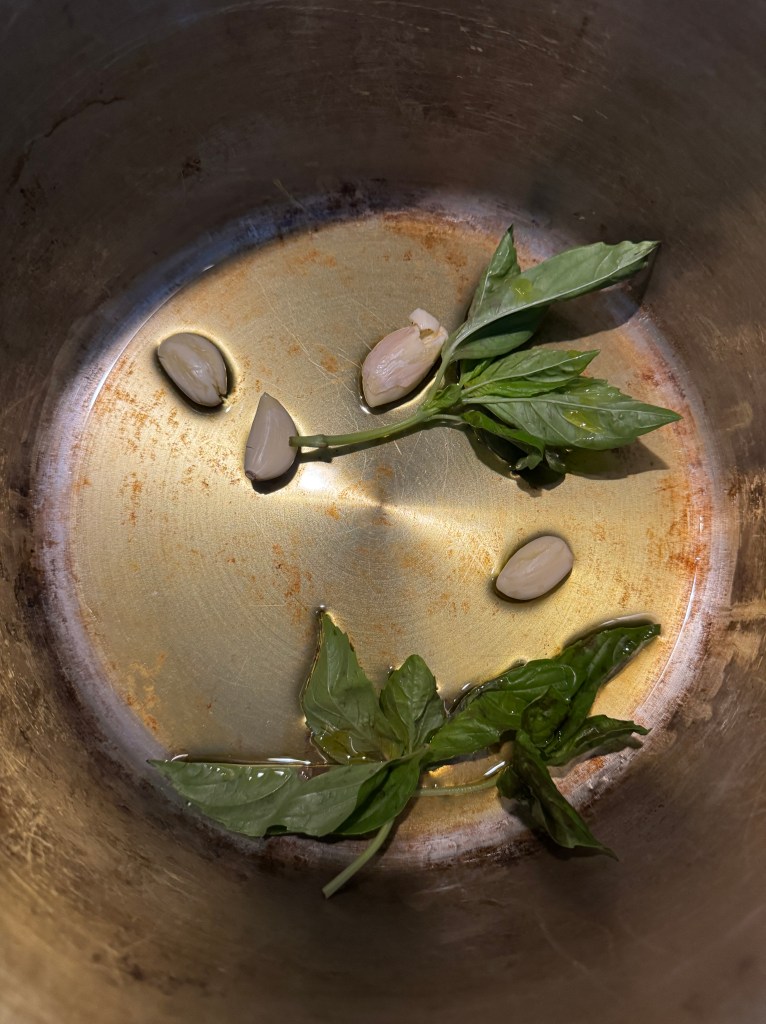
Now that you’ve broken the spirit of your broth, we can start with the main dish. You’re going to cut up an onion, a bulb of fennel, and a bunch of garlic cloves. These should be cut really small – it’s not an onion/fennel stew, it’s seafood stew. These guys are merely backup singers in the show (I am all over the place on my metaphors, I know).

To cut the fennel up, you’ll need to remove the core, but it’s weird to explain, so I’ll let my favorite convict Martha tell you about it (hey, my last post was for Prison Sauce, there’s a theme here, maybe?!):

Once you have everything cut into little altos and sopranos (they’re backup singers, get it, ohhhhh I see what you thought I meant with sopranos, no I’m not involved in anything illegal, do laws exist anymore?), you’re going to add some olive oil to a stock pot, heat it up to medium, and then add the veggies and saute them for a few minutes to soften their edge a bit and get them smelling all fragrant. Then add a pinch or two of red pepper flakes to the pan, depending on how spicy you want it to be.

Next, you’re going to add more dry white wine to the mixture. If you bought a 4 pack of mini-bottles, empty one of those in; if you’re still full sized or nothing, another 3/4 of a cup should hit the pot. Let that reduce by about half, which should take another 3-5 minutes or so.

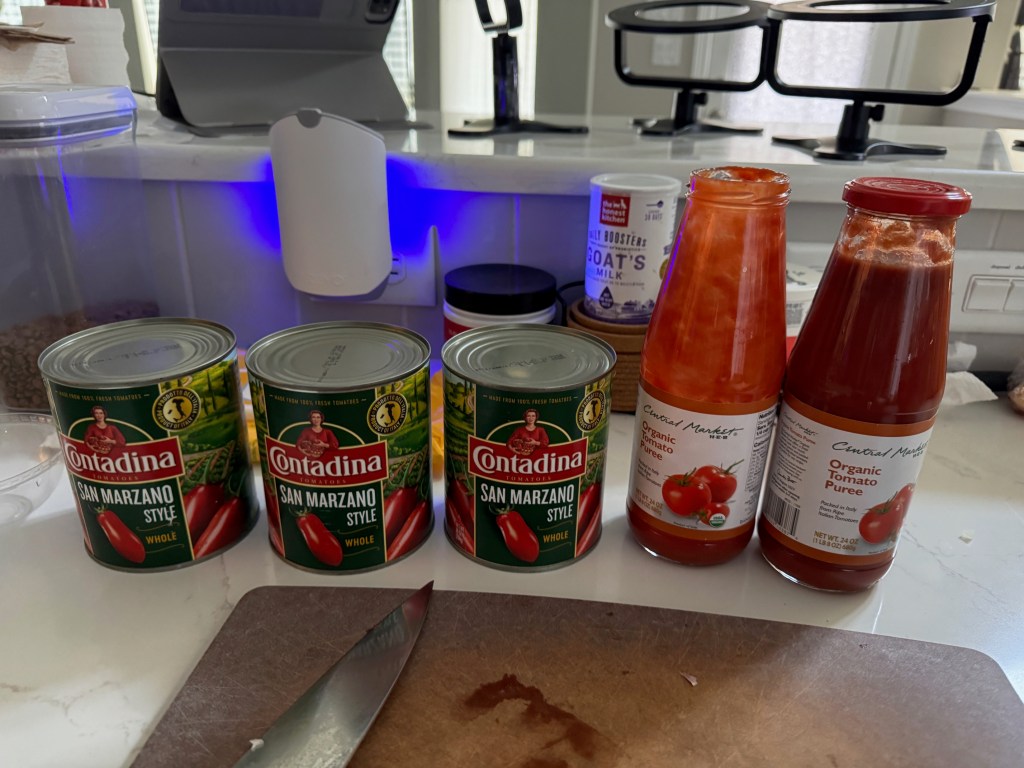
Once that’s reduced, you’re going to add in all of that delicious broth you strained/smashed, as well as a big can of crushed tomatoes. Get that up to a simmer and let that go for 15 minutes or so to get the veggies soft, and so the broth and tomatoes can get chummy with each other, maybe unite around public health, Miami being in the college football playoff over Notre Dame, any number of things.

While the broth mixture is doing its thing, you should start getting your seafood ready to go. If you’ve thawed frozen seafood, it’s probably best to lay it on some paper towels to get rid of the excess moisture. This isn’t a dish where browning matters, but you’ve spent so much effort building a strong flavor base, you don’t want to dilute it.

Here’s our seafood fit check:

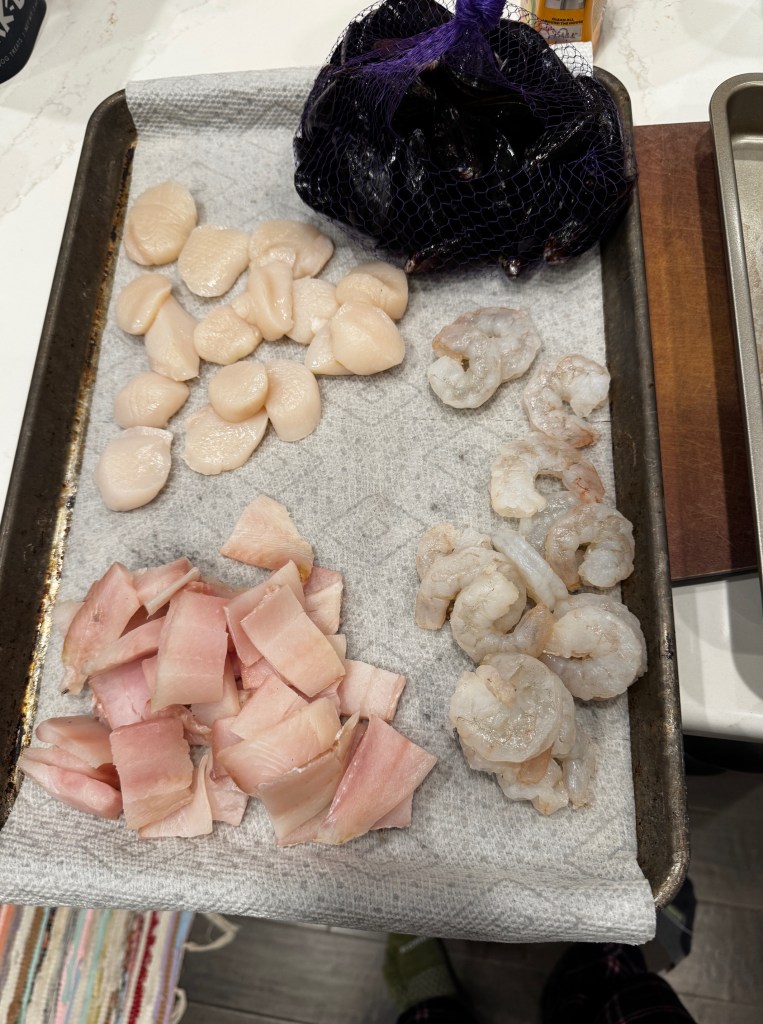
We got us some shrimps, scallops, mussels, and snapper. Snapper isn’t typical for cioppino, you’d usually have a meatier fish like a cod, but you dance with the fish that Sea2Table sent ya (not a sponsor…though they could be). Cut anything that isn’t in bite size form to bite size form. Especially the mussels, definitely cut those up.

(Please don’t.)

When everything is ready to go, you’ll start layering in your seafood from longest to cook to shortest. Typically the fish would go in first, then scallops, and then shrimp (snapper is so thin that I put them above the shrimp).

The final layer needs to be the mussels, for three reasons.

  • The mussels need to cook all the way through, or it’s going to get ugly, and the only way you’ll know they’re done is to see them open up.
  • They make this sound when they hit the broth like they’re screaming for joy. Or death. It could go either way.
  • Their tears I mean juices are going to add another layer of flavor to the dish.

Cover the pot with a lid and let it go for 3-4 minutes. Then come back and see how the mussels are doing. They’ll probably need a couple minutes more, but this will give you a sense of where things are.

Once the mussels are opened, you’re all set to eat. Get yourself a bowl, ladle a whole bunch of broth and seafood into a bowl, and then grab a hunk or three of crusty bread and devour. You’ve earned this – trust me, that’s what the mussels said in their last breath.

Cioppino

Adapted from Ina Garten and Brian Lagerstrom

Serves 4-6

Ingredients

4 T olive oil, divided 2 x 2 T

1 pound shrimp, shelled and deveined, shells reserved

3 celery stalks, chopped

2 carrots, washed and chopped

2 medium onions, 1 chopped and 1 finely diced

4 cups chicken broth

1 8 oz bottle of clam juice

1 cup water

1 1/2 cups dry white wine, divided into 3/4 cup servings

1/4 cup tomato paste

6 thyme sprigs

1/2 bulb fennel, diced small

4-6 garlic cloves, minced

1/2 t red pepper flakes

1 28 oz can crushed tomatoes

1 pound meaty white fish, like cod

1 pound scallops, cut into bite sized pieces

1 pound mussels

Directions

In a large sauté pan, add 2 tablespoons of olive oil and heat over medium-high heat. Add the reserved shrimp shells, followed by the carrots, celery, and chopped onion. Saute for 15 minutes, until the shells have turned pink and the vegetables have gotten some color. If the bottom of the pan starts to brown too quickly, add a tablespoon or two of water to deglaze the pan.

Add the chicken broth, clam juice, water, 3/4 cup of the white wine, tomato paste, and thyme sprigs to the pan. Bring to a boil, then reduce to a simmer and cook for 1 hour. Strain through a fine-meshed sieve, pressing on the vegetables and shrimp shells to extract as much broth as possible. Taste and add salt and pepper as needed.

In a large pot, add the remaining 2 tablespoons of olive oil, and heat over medium-high heat. Add the fine diced onion, fennel, and garlic to the pan, and saute for 3-5 minutes, until fragrant. Add the red pepper flakes and cook for 1 minute. Add the remaining 3/4 cup of red wine, and cook until reduced by half, about 2-3 minutes.

Add the reserved broth and can of crushed tomatoes to the pan. Bring the mixture to a boil, then reduce to a simmer and cook for 15 minutes.

Check the mussels to ensure they are alive. If any shells are open, tap on them to see if they close – if they do not, discard them. Discard any with broken shells.

In even layers, add the fish to the pot, followed by the shrimp, scallops, and mussels. Cover the pot and cook for 3-4 minutes. Remove the lid to check on the doneness of the mussels. Continue cooking until the mussels have opened, about another 2-4 minutes.

Ladle broth and seafood into a bowl, and serve with crusty bread.

Prison Sauce, because you never fly without your lucky hat

Well hey there. It’s been a while, how’s everything been going? The kids are good? Let’s see, what’s happened in the world since we last talked? Umm, Travis Kelce got a new girlfriend…that Chappell Roan sure is something…Great Britain had a head of lettuce that lasted longer than a prime minister…the guy that got killed by The Mountain is everyone’s favorite person in the world…and that’s it, nothing else has happened outside of those things…nope, nothing else…

So since we’ve last spoken, I’ve watched Goodfellas probably about 972 times. And pretty much the most memorable scene to me (outside of the reveal of Frankie Carbone’s frozen body with an icicle booger hanging off his nose) is the one where they make their nightly dinners in jail. Now, I have so many questions about this setup, and the one where they give prisoners access to an open flame is pretty far down the list (even though it should be #1 in about every normal circumstance).

(I originally used a hyphen instead of parentheses in that last sentence, but that could have been interpreted as an emdash, which might have made you think this was AI-generated. Oh yeah, that’s another thing since we last talked…)

(Also, I’ve probably watched A Few Good Men more than Goodfellas, but the only food scene they have is Daniel and Jo’s awkward crab night out, so I strenuously object to doing anything from that film.)

But, that sauce they make looks absolutely delicious, and since last week was my birthday (back to prime numbers again, have fun guessing which one…ok it’s 29) I decided to make a big pot of it for me and my lady to enjoy. And it definitely makes a big pot, but if you’re going to do it right, might as well go big.

(I would say go big or go home, but I’m a homebody. You have no idea of my desire to want to go home.)

Most of the sauce I winged it on, except for the meatballs. For those, I always use the recipe from Stephen at Not Another Cooking Show. In my opinion, of all the food Youtubers, Stephen is the most underrated and deserves much more exposure than he gets. He makes great food, and has resisted the Mr. Beastification that most other sites have given in to.

(I sometimes imagine what a food Youtuber party would be like. This is my best guess:

  • Joshua Weissman is hosting (of course), and he’s made Pigs in a Blanket with homemade sausages and Wagyu queso dip
  • Claire Saffitz baked some triple dulce de leche brownies, which nobody told her she had to, but she’s awesome like that
  • Stephen and Babish are drinking single malt scotch and debating whether Nebraska or Born To Run is the quintessential Springsteen album (spoiler: this is what all white guys from New York/New Jersey do)
  • Emmymade and Nisha are playing rock-paper-scissors to see which one of them has to put one of those black bro-latex gloves over their heads and blow them up like a balloon
  • Everyone wishes Ethan Chlebowski could have made it, but he had to get a second workout in, because those abs aren’t going to shred themselves
  • Sohla and Adam Witt introduce The Preppy Kitchen guy to Jello shots, and after 2 he starts saying really nasty stuff about Gemma the Bigger Bolder Baking chef, who seems lovely, but alcohol + competitive nature = potty mouth
  • Gemma can’t hear them though, because Matty Matheson is enthusiastically telling her about the time when he and the other cooks at his first restaurant got lit up on some questionably sourced coke and almost hit a moose driving at 120 km/h, and she’s politely listening to him and deciding not to remind him that she was the one driving the car
  • They’re all relieved that everyone followed one rule: no one tell Adam Ragusea about it)

Where was I…oh yes, sauce. Here’s a couple things to keep in mind:

  • You need a big pot for this. I used a 12 quart stockpot, and at its peak the sauce was over halfway up the sides.
  • There’s a reason why it’s typically called Sunday Sauce, and not weeknight sauce. This thing is going to cook for hours, so make sure you plan accordingly.

All good? Let’s make this thing.

The first thing you’ll do is get your olive oil infused with some garlic and basil flavors. You’ll want to pour enough oil into the pot to cover the bottom. Then, place a few sprigs of basil in the pot, and smash a few cloves of garlic and throw them in there. Something like this:

(I finally learned to take pictures at each step of the process! You’ll see that there’s a point in the process where I forgot to keep doing this!)

Turn the burner on to medium-low. You’re not wanting to fry them, you just want to extract the flavors gently from them. While this is heating up, chop yourself some onions.

Again, almost forgot to take the picture, but look, those are real onions! I bought two, but only ended up using one. It was pretty big, and you don’t want to use too many onions.

Let the garlic and basil go until the garlic starts to brown ever so slightly. Once the cloves start turning a little golden, they’re done. Pull them out, and then dump in your onion, and turn the heat up to medium.

See, it’s a good amount, but not too much when you see how much else we’re going to add to the sauce.

Let those onions cook, stirring every couple of minutes or so, until they soften but before they turn brown.

While they’re cooking, it’s time to start talking tomatoes. And you’re going to need a lot of them.

See that! I only used one of the jars of tomato puree before I remembered to take a picture! I’m getting better at this, I might start doing this for a living…no, no I won’t please don’t tell my boss about that…love you Mr. Vandelay!

I used a combination of whole tomatoes and tomato puree – I like some texture to my sauce, but do however you want. I dumped the puree into a large bowl, then added the whole tomatoes and crushed them with my hands in the puree. If you do it when they’re submerged, it keeps them from exploding on you. Plus, when you pull your hands out they’re covered in red stuff, and it looks like you just roughed up a deadbeat. You know, like you’re in the mafia or something.

Once the onions are softened, go ahead and dump all the tomatoes in to the pot. Also, rinse out the cans and bottles and pour them in as well. I mean, don’t fill the entire can up, just use as much as you need to loosen everything up. But even if you go a little overboard, it’s going to be cooking for a long time, so the water should cook out. Then, get the pot up to a simmer, and let it go while you start working on the meats.

And ohhh, will there be meats. You’re gonna be like Arby’s, except good.

I decided to kick mine off with spare ribs. I was planning on buying a full rack and cutting off what I needed, but H-E-B knew I was coming so they stocked packages of individual ribs cut up.

Get these in to a saute/frying pan of some sort with a good hit of oil, and brown them until they look something like this.

Getting that color is probably going to take about 5 minutes a side. Once they’re ready, add them to the tomato bath, and then let them simmer for a couple of hours. Also, that brown stuff at the bottom of the pan, that’s delicious stuff. Add a little wine, or stock, or water to it and scrape up the goodness and add it to the pot.

Once you get this settled at a simmer, you’re going to let it go for at least 2 hours. Yep, you read that right, not a thing. Just go over and stir it every so often, rewrite the Constitution, play hide and go seek with your dog, whatever you want.

One small caveat: you will want to watch the consistency of the sauce. If it gets too thick, add a cup of water to thin everything out. Again, this is going for a very long time, so even if you end up adding a lot, that’s going to all cook out over time. Early on, err on the side of caution.

Second small caveat: WHO’S A GOOD PUPPY???

So I am hardly an expert in Italian cuisine (and trust me, if I was, you’d know, because they’re not a subtle group), but my understanding is that the Sunday sauce needs to have at least 3 meats. However, I’m pretty certain that there are laws against you not using sausage and meatballs, so those 2 are locked in. I prefer pork ribs because they’re not as heavy as beef chuck or short ribs, which a lot of people like. But if that’s your thing, knock yourself out. Just make sure you bump the cook time from 2 to 4 hours, and expect to add a little water during the process.

Now, once a couple hours has gone by, grab yourself a few sausage links and cook them up in the same pan you cooked the ribs in. Get ‘em good and browned up, like so:

Once they’re browned up, add them to the sauce, and let them go for another hour.

While those are going, it’s time to make the meatballs. You could have made those earlier, but admit it, you liked having that 2 hour breather.

I made a few mistakes along the way, which I’ll point out so you can avoid them. They still turned out good though, and the worst case scenario is that you end up having chunks of meatballs in the sauce instead of meatballs, so don’t sweat it too much if something is a little off.

To get started, get a big bowl and dump your ground meats into it. I used a pound each of ground beef and ground pork. You can mix it up, go all beef if you want, even a little lamb if you have some. But no lean meats here (i.e. chicken, turkey breast, Chris Christie – ok I gotta update that joke, no one remembers who he is anymore) – this is not healthy cooking, and you’re going to need the fat to keep the meatballs juicy and mois…nope, not using that word.

Anyways, break the ground beef strands up so they don’t get too clumpy. Then crack some eggs into the bowl. This was my first mistake – I went with 4 eggs, but probably should have used 3. You can learn from my mistake, and use 3, unless yours are really small I suppose. But once you’ve cracked the eggs in, mix everything together so the eggs coat the meats.

Then in another bowl, let’s mix together the “dry” ingredients. First thing you’ll do is take 1/4 cup of that delicious tomato sauce you’re cooking up and add it to the bowl. Chuck in some milk – cream, half and half, whole milk, maybe even 2%. No skim milk, that’s just cloudy water. Oat/almond/soy milk…I mean, if that’s what you have around, I guess…no…stop it, go get some cow milk…

Snapping back to reality, chop up a good handful of Italian parsley and add that to the bowl. Then toss in some panko bread crumbs (if all you have is the Italian bread crumbs in the blue cardboard tube, those will be fine, but probably cut back to 1 cup since they’re more dense). Add in some grated Pecorino Romano cheese – whether you grate it yourself or buy it pre-grated is your call. Then mince up 3 cloves of garlic really finely and add those in, and then finish with a strong pinch of salt. Once everything’s in, mix all of the dry’s together and give it a taste. It should be really salty, since this is going to do all the seasoning work for the balls.

Now add the dry’s to the meats, and mix them together. Make sure you get them well combined, but don’t overwork them. If they get too overworked, the meatballs will be springy and compacted, which isn’t what you’re going for. So, don’t use this as your opportunity to work out your anger over Taylor Dearden on The Pitt getting snubbed for an Emmy nomination but they found room for four of the White Lotus actresses. No, definitely suppress that rage and be gentler, so it comes together like this.

(Ok I’ve spent the last 10 minutes cracking myself up over how Victoria Ratliff would react to this recipe. “Tiy-umm, you cain’t go too prisonnn, I have to make Sunday saouce for yoooou, like you used to have at Dooke!”)

This is where I made my next mistake, which was not adding a few breadcrumbs to offset the excessive egg-age. Again, just a lesson that you need to be flexible.

Now, it’s time to make the balls. How big you make them is up to you.

I prefer them smaller, around golf ball sized. Whatever size you make them, just be as consistent as possible. You don’t have to go all anal-retentive chef and measure them out, just make sure that you don’t have golf and tennis ball sized ones.

Once you’ve got them all made, get your trusty meat skillet out one final time, and pour in some neutral oil (vegetable, sunflower, corn, baby). You’ll be shallow frying the meatballs so you’re going to need a good amount, maybe 1/4 inch or so. Then turn the heat up to medium-high.

(This is where I stopped remembering to take pictures of each step.)

When the oil is warmed, start putting the meatballs in the pan. You’ll need to do this in two batches, so space them out accordingly – it’s key to leave enough space so you can flip one without smashing the others near it. You want to get them browned on each side, which will probably take 5 minutes per side.

Once they’re all browned up, add them to the sauce. Be gentle adding them in, so you don’t break up the balls.

Then you just have one final cook for the sauce. If you made golf ball sized balls, you only need another 30 minutes or so to get them cooked through. If you did tennis ball sized ones, figure on an hour. Stir every so often, but try not to be too vigorous – again, not the worst thing in the world if the balls break up, but you worked really hard to make them, so give the balls a fighting chance.

While the sauce is finishing up, get a pot of water boiling and cook your pasta.

Now, is this authentic? My god no, I’d get shanked in the back of the head like Morrie for even suggesting it (actually it’d be more like Alan King in Casino). But, it’s still a pretty tasty sauce that will make you and a bunch of your family or friends pretty happy.

Prison Sauce

Meatballs from Not Another Cooking Guy

Serves 10-12

Ingredients

1/4 cup extra virgin olive oil

4 garlic cloves, peeled and smashed

2-3 sprigs basil

1 large onion, diced small

3 28 oz cans whole tomatoes

2 24 oz jars tomato puree

1 1/2 pounds spare ribs, cut into individual ribs

1/4 c white wine

1 pound Italian sausage links

1 pound ground beef

1 pound ground pork

3 eggs

1/4 c cream

1/4 c chopped Italian parsley

1 1/3 c panko bread crumbs

1 1/3 c Pecorino Romano cheese, grated

3 garlic cloves, minced

Salt and pepper

Neutral oil for frying meatballs

2 pounds spaghetti

Directions

In a very large stockpot, cover the bottom with a thin layer of olive oil. Add the smashed garlic and basil sprigs. Turn the heat to medium-low to slowly infuse the oil with the garlic and basil flavors. Let the oil infuse until the garlic starts to brown, then remove the garlic and basil and discard.

Add the chopped onion to the pot, increase the heat to medium, and continue cooking until the onion softens but before it browns.

While the onions are cooking, pour the cans of tomatoes and tomato puree into a large bowl. Submerge the whole tomatoes, and crush them with your hands – submerging will reduce the amount of splattering.

Once the onions have softened, dump the contents of the bowl with the tomatoes into the pot. Bring the tomatoes to a simmer, and let them cook while you begin prepping the meats.

While the tomatoes are simmering, add a couple tablespoons of oil to a large saute pan, and heat over medium-high. Add the spare ribs to the pan, and brown on each side, about 5 minutes per side. Once browned, add the ribs to the pot. Add the wine to the saute pan, deglaze, and then pour the contents into the pot. Simmer the sauce for 2 hours.

In the saute pan, cook the sausages on medium-high heat until browned on all sides. Add the browned sausages to the sauce pot, and simmer for 1 hour.

While the sausages are simmering, prep to make the meatballs.

In a large bowl, add the ground beef and pork. Separate the strands of meat so they are relatively untangled. Crack the eggs into the bowl, and mix with the meat so the strands become coated with the eggs.

Scoop 1/4 cup of tomato sauce from the pot and add it to a separate bowl. Add the cream to the bowl, then follow with the parsley, bread crumbs, cheese, and grated garlic. Add in a large pinch of salt and several grinds of pepper, and mix until homogenous.

Add the ingredients from the bread crumb bowl to the meat bowl, and mix until the meats are combined with the bread crumbs, but not overworked. Form meatballs of golf ball size (about 1 inch in diameter), and set on a plate.

Add enough neutral oil to the saute pan to shallow fry the meatballs, and turn the heat to medium-high. When the oil is heated through, add half the meatballs to the pan. Cook on one side until browned, about 5-6 minutes. Turn meatballs and brown on the other side. Remove the meatballs and place on a plate. Repeat with the remaining meatballs.

Add the meatballs to the pot, and simmer until the meatballs are cooked through, about 30 minutes. For larger meatballs, increase the simmer time to 1 hour.

While the meatballs are simmering, cook the spaghetti to the package instructions.

When the meatballs are finished cooking, turn off the heat. Remove the sausage links and ribs from the pot. Cut the sausage into smaller pieces. Debone the ribs, cut the meat into smaller pieces, and return the rib meat and sausages to the pot.

Add a serving of spaghetti to a plate or bowl, and top with sauce.

Hasselback Potato Casserole, because Al Harris can find two ways to describe how delicious this is

Several years ago, when I was first discovering the cooking blogosphere, I came across a recipe for Hasselback Potatoes.

I mean, this looks really cool. It’s like having crispy potato chips in baked potato form. This is totally worth looking into!

So I did a little research to learn more about these potatoes, and I discovered 3 things.

  • The dish originated in Sweden, which raised all sorts of red flags. Any cuisine that boasts of fermented fish as one of its staples should have its legitimacy questioned.
    • Swedish meatballs I guess are ok, well not really. I still have painful memories of going to some fancy reception as a kid, and my parents tried to appease me by saying, look they have meatballs. So I had one, because spaghetti and meatballs are great, and then I asked why they left these out in the sun for three days to spoil. So, no, they suck too.
  • The dish has nothing to do with Matt Hasselbeck, former NFL quarterback and current ESPN talking head, who made perhaps the most boneheaded declaration in playoff history, when he said they were going to take the ball and score, only for him to throw a sadly weak pass that Al Harris returned for a touchdown.

(On a tangent, but every time I hear Al Harris’s name, it reminds me of an episode of Dinosaurs, where one of Earl’s coworkers, Al “Sexual” Harris, was notorious for making sexual innuendo comments couched in a normal statement, and then they would all scream “TWO MEANINGS”, as if he’d discovered some sort of loophole to say dirty things without saying dirty things. Because yeah, that’s always a good idea.)

  • The dish requires you to slice almost all the way through the potato, but stop just short of the bottom. Now this should be obvious given how the dish looks, but of course it didn’t occur to me until I decided to give it a shot. Which I knew there was no way I’d be able to make any sort of uniform cut across the potato, so this was a no-go.

(Of course, years later I would see that people found a hack where you can lay a chopstick on either side of the potato, and it will stop the knife just short of the bottom. Which would have been helpful, because my old neighborhood was overrun with Chopsticks ‘R’ Us franchises at the time.)

Then a few years ago, I was looking through the bible (otherwise known as The Food Lab, written by our lord and savior J. Kenji Lopez-Alt), and saw that he had a recipe for Hassleback Potato Casserole. And no slicing almost to the bottom, this was a full-on cut through the potato, so this had real potential.

This is basically a potato gratin, but with the potato slices vertical instead of horizontal. Why does this matter?

You see all those crispy bits at the top of the potatoes? That’s from them sticking up by themselves and getting a little burned, as well as being covered in a not insignificant amount of cheese. You don’t get that from a regular potato gratin (which is plenty delicious on its own, no shade here).

(Do the kids still say shade? Or is that mid now? Don’t put me on fleek!)

I won’t lie, this is a pretty involved recipe. It’s not impossible, but it takes a lot of time and patience.

Let’s talk cooking vessels first. The recipe calls for a 2 quart baking dish, which sounds lovely except that measuring quarts includes depth, which doesn’t make a difference in this recipe. You should be much more focused on surface area (don’t you wish you paid attention in high school geometry now). I made mine in a 8×8 dish that was a little over 2 inches deep, and for that it took almost 5 pounds of potatoes. Prepare accordingly.

There’s two major components to this dish: the potatoes and the cream sauce.

First let’s hit the cream sauce. This isn’t super complicated, except for the cheese. No pre-shredded cheese, you’re going to have to do your own shredding here. It’ll be worth it, and you’ll be amazed how far just a few ounces of cheese will go.

Most grocery stores will have a specialty cheese area, and you should be able to find small blocks of Parmesan and Gruyere cheese. If you can’t find Gruyere, Swiss would be an ok substitute.

When you’re buying your potatoes, you want to look for ones that are longer and thinner, as opposed to shorter and thicker ones.

The reason you want to do this is because you’re going to want to pack the potato slices as tightly as possible, so the more length you have,

the fewer potatoes you’re going to need. Heck, if you want to get all mathematical on me, you could actually measure the potatoes by length instead of weight to figure out how many you’re going to need. Because it’s not at all weird to bring a tape measure to the grocery store, but you do you.

(Err on the side of too many potatoes. You can always bake the leftovers, but it’ll be a pain if you come up one potato short and have to go get more.)

Once you get your super long potatoes (did I mention that my 5 pounds came from just 3 1/2 potatoes? That’s not weird at all, right?), you’ll need to peel them (don’t get lazy on this step, it will make a difference if you don’t peel them), and then slice them as thinly as you can.

If you’ve got a mandolin slicer, you’re set, just set the blade to 1/8″ and go to town.

If you’re accident prone like me, don’t even think about getting one of those, at least without first programming directions to the nearest ER into your GPS. You don’t need to get them all exactly 1/8″ thick, some will be thinner/thicker than others. As long as you don’t have any like 1/2″ thick, you’ll be fine.

Now that you have your potatoes and whatever parts of your finger that might have gotten caught in the mandolin sliced, you’ll want to submerge the slices in the cream mixture.

But not all at once. Oh no, you didn’t think it was going to be that easy, did you? No, you need to make sure that every single slice is coated in the cream mixture. Drenched? No. Coated? Yes. Whether it works better for you to go one slice at a time, or putting in a handful and separating them in the cream, it’s your call. You don’t want dry potatoes that are going to stick together and create a lump of sadness.

Once you have a goodly amount of potatoes in the cream (I can’t tell you how many is a goodly amount, you’ll just know), you’ll want to pull them out and start placing them in your baking dish. I prefer shaking off a little of the excess cream before I put them in the dish, but it doesn’t really matter since any excess is going to fall to the bottom of the dish anyways.

As you’re putting them into the dish, keep them even and tight. You want the slices to be packed in as tightly as possible.

This will take a while – it took me about 30 minutes to go through the entire peel/dunk/assemble process. But when it’s done, it’ll be a thing of beauty. Then you get to pour the remainder of the cream mixture over top of the potatoes. The recipe says you only need to pour it halfway up the potatoes, but I went a little overboard and went almost to the top of the pan and they came out fantastically.

When you put the dish in the oven, make sure that you place a sheet pan underneath it. The cream could boil over a little bit, and it will be messy if it hits the bottom of the oven.

It’s going to take a while for the potatoes to cook. They’ll go 30 minutes covered, then 30 minutes uncovered, then you’ll sprinkle the cheese that didn’t go into the cream mixture on top of the potatoes for the last 30 minutes.

When they’re done, let them sit for maybe 10 minutes or so to let the cream cool down. You’ve spent a lot of time putting together this masterpiece, the last thing you want to do is scald the roof of your mouth eating it too quickly.

Hasselback Potato Casserole

From Serious Eats

Serves 6-8

Ingredients

3 ounces finely grated Gruyere cheese

2 ounces finely grated Parmesan cheese

2 c heavy cream

1 T fresh thyme leaves, chopped

2 garlic cloves, finely minced

4-5 pounds russet potatoes, peeled and sliced about 1/8″ thick

Directions

Preheat the oven to 400 degrees F. Move the oven rack to the middle position.

Grease the bottom and sides of a 2 quart casserole dish.

Combine the cheeses in a large bowl. Move about 1/3 of the cheese to a separate container and set aside.

Add the cream, thyme, and garlic to the large bowl with the cheese, and combine. Season generously with salt and pepper.

Add potato slices to the bowl in batches, and toss to make sure that every slice is coated. Separate any slices that stick together.

Grab a handful of potato slices and arrange them into a stack. Place the stack along the edge of the casserole, stacking the potatoes vertically. Repeat with remaining potatoes, continuing to stack in rows if using a square or rectangular casserole. If using an oval casserole, first stack along the perimeter, and then move to the center. The casserole should be very tightly packed.

Pour the remaining cream mixture over the potatoes until it comes halfway up the sides of the potatoes. Depending on how many potatoes are used, you may not need all of the cream.

Place the casserole on a sheet pan, cover the casserole tightly with foil, and place it in the oven for 30 minutes.

Remove the foil and bake for an additional 30 minutes, or until the top is beginning to turn a pale golden brown.

Remove from the oven and sprinkle the reserved cheese over the potatoes, and return to the oven for a final 30 minutes, or until the top has turned deep golden brown.

Remove from the oven and allow to rest for 5-10 minutes before serving.

Spatchcoked Turkey, because this is the king of all birds

image

So, I’m sitting on my couch last week, planning out everything for Thanksgiving dinner. Since I only cook one Thanksgiving a year (we stopped celebrating Canadian Thanksgiving after Trudeau was elected), I had to go back and remind myself how to cook the spatchcocked turkey.

This year I actually kind of planned ahead, to make sure I not only got everything planned out that I needed to do, but actually get this post up in time for people to actually be able to do something about it. So let’s go into the way back machine and travel back to 2017, where this all got started…

(Oh and save that turkey carcass, we’ll be making turkey stock from that this coming weekend)

giphy

The truth is, people don’t make enough turkey during the year, which is a shame. I mean, turkey is delicious (if you’re one of those weirdos that say that turkey sucks and is flavorless, that’s because your mom sucked and was a really crappy cook, and you should be barred from spreading your genes into future generatio…I mean, you need to try this recipe). It’s relatively cheap – usually turkeys run about $1.50/pound, and you can make so many meals out of one bird. And, if you cook one outside of Thanksgiving, you don’t have to worry about rushing the carving to feed your shitty drunk uncle that’s going to spend half the night complaining about how Hunter Biden is conspiring with Fidel Castro (he’s dead which is even better) to force us all to switch genders. So, do yourself a favor and start learning to make one out of season. You’re probably saying to yourself at this point:

  • I’m afraid to google spatchcocking, what exactly does that mean?
  • How does he know my family so well?

These are valid questions!

Spatchcocking is a fancy way of saying we’re going to butterfly the bird.

What does that mean? It means we’re going to take the backbone out of the turkey, and then flattening it out by pushing down on the breastbone until you hear it crack, because WHO’S YOUR DADDY MR. TURKEY YOU’RE NOT SO TOUGH NOW ARE YOU I OWN YOU I AM THE BENGALS (YEAH MOTHERFUCKERS WE RUN THE AFC NOW) AND YOU ARE THE SAD LITTLE BROWNS WAITING FOR YOUR SEXUAL PREDATOR SAVIOR TO ARRIVE!!!

Now, you may be saying to yourself, that seems like a lot of work. Why would I want to do this? You seem to have a lot of aggression issues to work out that I’ve managed to get through, why should I crack this guy’s back to help you deal with your problems?

Well Mr./Mrs./Ms./Non-Binary Smarty Pants, the reason why is that you’re going to get the turkey to cook evenly and crisp up the skin to make it absolutely delicious. That good enough for you?

Here’s the thing: there are two types of bird meat: white and dark. And they need to cook to different temperatures (the USDA will tell you that white meat needs to be cooked to 165 degrees, and dark to 180. I will tell you that you can do 150/165 and be just fine.)

When you cook the bird whole, everything gets smushed together, so it’s hard to get everything cooked evenly, so the breast gets done well before the dark. Also, some of the skin gets bunched up into the meat, so it stays sad and flabby. But, if you spatchcock it, everything is laid out in one layer, so everything cooks evenly, and all of the skin is exposed to the heat. The benefit is that you’ll be able to cook your turkey in about half the time of a normal bird, and all of the skin will be cooked super crispy.

So let’s start with buying the bird. For spatchcocking, you’re going to need to get a relatively small bird, no bigger than 12 pounds. Anything bigger than that isn’t going to fit on a sheet pan. Besides, do those 20 pound turkeys look natural to you? Each one of them looks like Morganna the kissing turkey. If you’re like the Duggars, or Phillip Rivers, or one of my ancestors that had 10 kids because no one understood birth control back in the 1880’s, get two 10-12 pound turkeys.

Now, there is going to be planning involved. You’re going to need to get the turkey at least three days ahead of time so it can thaw out, unless you can manage to find a fresh bird somewhere (you’re reading my blog, so you probably can’t). You could speed up the process by covering it in cold water for several hours, but you’ll probably give yourself salmonella, so just stay away from that.

The biggest inconvenience is that you’re going to need a good deal of refrigerator space for the turkey. This would be a good time to get rid of that Chinese food from Wong Wu’s, which closed down three years ago.

https://youtu.be/-eGF2pbmVyA

Now, the day before you cook your turkey, you’ve got a choice to make – am I going to brine the turkey or not? You’re not going to wet brine it, because it’s a pain in the ass and all you’re going to do is waterlog the turkey, and yeah it’ll be moist but so is a wet sponge and you’re not going to eat that, are you, never mind don’t answer that.

No, instead we’re going to dry brine it, if you’re so inclined. All this means is that you’re going to coat the skin with a mixture of kosher salt and baking powder. This will draw the moisture out of the skin, so it’ll crisp up and brown perfectly. After 12-24 hours of brining, it’s going to get all light and transparent-looking, and you’ll know that it’s ready.

You can also decide not to, but really, if you’re going to take the time to hack a turkey in half, a few extra minutes of work shouldn’t be too much for you. But, if you decide not to, you’ll probably be ok too. Just be sure to salt it before you put it in the oven.

Now, the spatchcocking process. Get yourself a good pair of kitchen shears – really powerful scissors will work in a pinch. You’re going to cut the backbone out of it, which will take a few minutes. Save the backbone, we’re going to use that for the gravy later. Oh, and save the goodies in the plastic bag inside the turkey.

Once you’ve broken the breastbone and the turkey’s spirit, you’re ready to cook!

Now, that backbone you just took out. You’re going to need to hack that into smaller pieces for the gravy. If you have a cleaver, this would be a great time to use it. Also, if you have a cleaver, stay away from me. If you don’t, do the best you can to find some joints in it to cut through easily.

Once it’s finished cooking, and you’ve given it enough time to rest, it’s carving time. Again, we’re going to the video, because I am not even going to act like I can teach you that.

When you start carving it, you’re going to hear that lovely crackling sound of super crisp turkey skin, and the bird will be the best one you’ve ever tasted. And I’m sure you’ll drown it in too much gravy, but that’s on you.

Spatchcocked Roast Turkey and Gravy

From Serious Eats

Serves 10-12

Ingredients

For the brine

6 T kosher salt

2 T baking powder

For the turkey and gravy

3 large onions, chopped

3 large carrots, chopped

4 celery stalks, chopped

12 thyme sprigs

1 whole turkey, spatchcocked and butterflied, backbone and giblets reserved

2 T vegetable oil

1 1/2 quarts chicken or turkey broth

2 bay leaves

3 T butter

4 T flour

Directions

Place the oven rack on the middle position in the oven.

Preheat the oven to 450 degrees.

Line a rimmed baking sheet or sheet pan with foil.

Mix up 2/3rds of the onions, carrots, celery, and thyme sprigs, and pour them onto the sheet.

Place a cooling rack over the vegetables.

Use paper towels to pat the turkey dry, and place it on the rack.

Rub one tablespoon of the oil all over the skin.

Season the turkey liberally with black pepper (if you don’t brine the turkey, season with salt as well).

Tuck the wing tips behind the back.

Move the rack to the oven and roast the turkey until the breasts measure 150 degrees and the thighs register 165 degrees, about 75-80 minutes.

While the turkey is roasting, chop the reserved turkey parts for the gravy.

Add the remaining tablespoon of the oil to a 3 quart saucepan, and heat over medium-high heat.

Add the turkey parts to the pan and cook until lightly browned, about five minutes.

Add the remaining vegetables to the pan and cook until the vegetables soften and brown, about another five minutes.

Add the chicken broth, remaining thyme sprigs, and bay leaves to the pan.

Bring the mixture to a boil, then reduce to a bare simmer for 45 minutes.

Strain the solids from the broth, and skim the fat off the top.

In the same pan, melt the butter over medium-high heat.

Add the flour and stir constantly with a wooden spoon until the mixture is golden brown.

While whisking constantly, add the broth to the pan in a steady stream.

Bring to a boil, then reduce to a simmer until reduced to 1 quart, about 20-30 minutes.

Season with salt and pepper as needed, and cover the pan to keep warm.

When the turkey is finished roasting, remove it from the oven and allow it to rest for 20 minutes.

Carve the turkey as desired.

Collect any juices from the turkey, and add them to the gravy.

Gyros, because sometimes serendipity leads to elevating a mediocre sandwich to greatness

One of the things my lady was very up front with me on when we first started dating was that she loved gyros. I mean, loooooooves gyros.

Which is a markedly different position than what I have had of them. In fact, on this very blog I identified at least 28 sandwiches superior to it (muffulettas were not an option and I’m sure there were others not on the list). My assessment of the gyro was:

You can call it lamb, but to me it’s just decent mystery meat in a pita with average creamy cucumber yogurt sauce.

Not the most ringing of endorsements! So I’d pretty much decided that this was just going to be one of those agree to disagree items…

…until one day when I pulled up the YouTube and saw 3 different How To Make Gyros videos. I took that as a sign that I might need to learn how to make this thing. And I have to say, I think I ended up making one far better than any that I’ve gotten in an anywhere.

So the first thing we need to do is define what a gyro is. I’ve enlisted my friend, Fluffy, to explain:

So what did we learn?

a) always start with English

b) never assume that the other person is Mexican because of the color of their skin

c) you might die if you pronounce it Jy-ro instead of Ye-ro

d) people will just let you think whatever you want to make a sale

I guess a gyro is similar to a taco in that there are meats and vegetables, wrapped in a flatbread with a sauce. But no, it’s totally not.

To make this recipe, I used 2 of the 3 videos I saw and incorporated those into this recipe: Joshua Weissman’s, who has become the It food YouTuber,

and Brian Lagerstrom’s, who came up with the method to make the gyro meat in a food processor.

So the base of the gyro starts with the pita bread. Now, this presents a problem, because there is not a single store bought pita bread that isn’t the driest piece of cardboard you’ve ever tried to eat. Seriously, they’re terrible; Brian’s video even suggests using tortillas as a substitute, which I agree is better than a store bought pita.

But no, we can do better than that. You can easily make pitas that will be 1000% better than anything you’ll get at Kroger. Now let’s hear your reasons why you can’t do this:

Oh Adam, I can’t mix the dough because my wife got the Kitchen-Aid mixer in the divorce!

Ok, so 1) you’ve never been married, 2) you had to look up that there’s a hyphen between Kitchen and Aid, and 3) you can mix this by hand.

Ok, well fine, but I bet you need one of those high powered ovens and pizza stones you see them use on the Guy Fieri shows!!

No, any old oven is fine, and you can use the back of a sheet pan in place of a pizza stone.

Ha! I gotcha! I don’t have a sheet pan!!

I mean…how have you gotten this far in life…every Target in America sells them…

(I have a Jewish mother, I’ve got a black belt in anticipating every possible way something could go wrong.)

Making this is pretty easy. Other than using some time management skills to plan how long you’ll need to let the dough rise and warm the oven, there’s not a lot of skill to it, and once you roll out one of the pitas it’s easy to replicate.

I should note, this recipe will give you some really large pitas. Which is awesome, but if you’re not prepared for it I suppose could be a bit jarring. If you’re wanting smaller ones, I would divide the dough into 10-12 pieces instead of the recommended 8. Or you could cut the recipe as well, but make sure you refamiliarize yourself with the pi r squared formula for the area of a circle if you do – linear math doesn’t work with circles.

After you’ve cooked up your pitas, you’ll have a pile of breads that look like this,

Just having done this, you’ve made something that would be one of the 5 greatest accomplishments of like 75% of the population. So you’re already killing it, and it’s only going to get better from here.

So most gyros have tomato slices in them and are dressed with tzatziki, which is a cucumber yogurt sauce (but you already knew that from when I made fun of gyros above). The problem with cucumbers is, well they’re basically water, and if you grate them up to put into a yogurt sauce and don’t drain them perfectly, then you’re going to have a watery sauce. But, instead, what if we combined the cucumbers and tomatoes into a relish, and then jazzed up the yogurt sauce?

(I’ve never jazzed anything up before, but there’s a first time for everything.)

The relish is really easy to put together. There are just two things you have to keep in mind.

1. Get an English seedless cucumber (ones that are wrapped individually in plastic, like they’re too good to mingle with the other cucumbers…like regular English people), unless you want a lot of the watery seed goop in the relish.

2. Use cherry or grape tomatoes, unless you want a lot of nasty tomato goo in the relish.

Knock yourself out if you want the goo, but those of us that like tasty things will pass.

A little chopping of the veggies, a squirt of lemon juice, and a little olive oil, and you’ve got yourself a relish.

The yogurt sauce is even easier. Adding mayo gives it a little more body, and if you use Duke’s mayo, well then you’ve added some real flavor too.

Fresh dill (no dry stuff) adds the sort of pickle flavor to it, and when you’ve mixed it all up, this is the beauty you’ll get.

Now, let’s talk about the meat…baby…let’s talk about you and me…let’s talk about all the good ok I’ve taken this too far.

The best way to approximate the texture of a typical gyro meat, unless you’re buying your own spit or rotisserie keep reading you know you’re not, is to combine the mixture in a food processor. The mixture needs to be ground almost into a paste, and that’s not going to happen without a food processor, unless you plan on chopping everything for a couple hours.

Also, you’ll have to process this in 2 batches, unless you’ve got a big one. It’s a small inconvenience but you will regret it if you try and do it all together. Learn from my mistakes.

So all you need to do is get your hands on some 90/10 ground beef (this is key because a higher fat content is going to cause flareups on the grill, which was cool when you were in grade school and thought fire was just awesome, but now you need less fire to make your food taste good), ground lamb (every grocery store has it now), onions, garlic, bread crumbs, and a bunch of spices. Then shape them into 6 balls, kind of football shaped.

The video suggests then sticking a couple skewers through each ball. Now, this requires you to remember to soak wooden skewers overnight so they don’t catch fire on the grill. It also requires you to have the balls on a flat enough surface where the skewer goes through the same depth across the entire ball. And it’s doable, but I found it to be a pain. I still did it, but next time I will probably pass.

I’m going to assume that you have a grill of some sort and know how to operate it. Could you do this on the stovetop? You could, but you are going to miss out on the char flavor, and that’s kind of a big deal for this.

(You didn’t think I was going to pass on that opportunity, did you?)

If you’re doing this on a charcoal grill, wait until the flames have died down before you put the balls on it – there’ll be plenty of heat there from the coals, don’t worry. Five minutes on each side should do the trick.

Then take the balls off the grill, and just admire the beauty of these for a minute.

How is this not going to be a good meal?

From here it’s pretty simple. Take the skewers out of the balls (I feel like I shouldn’t need to say that but you never know), and then slice them up into bite size pieces. I split each ball in half and then cut them into smaller slices.

Then it’s assembly time. Get yourself one of your pitas, slather some yogurt sauce on it, then put way too many meat slices on it, and top it off with the tomato-cucumber relish.

Take a second and look at it. You made a hell of a sandwich! This is better than anything you’re going to get from a local shop! The only bad thing…no juice.

Gyros

From Brian Lagerstrom and Johua Weissman

Serves 8

Ingredients

Pitas

14 g instant yeast

18 g sugar

487 g water

750 g all purpose flour

15 g fine or kosher salt

Cucumber-Tomato Relish

150 g English cucumber (about 1/2 large or 1 medium), halved and seeded, medium diced

150 g cherry or grape tomatoes (about 1/2 clamshell in most stores), halved or quartered depending on your taste

1/2 red onion, medium diced

1/3 cup chopped parsley

Juice of 1/2 lemon

1 T olive oil

Salt and pepper to taste

Yogurt Sauce

1 c plain yogurt

1/3 c mayo

Juice of 1/2 lemon

1 clove garlic, minced

2-3 T fresh dill, minced

Gyro Meat

1 pound ground beef (90/10 or leaner)

1 pound ground lamb

1/2 medium onion, roughly chopped

4 cloves garlic

1/2 c breadcrumbs (panko if you have them)

1 T cumin

1 T ground coriander

2 t dried oregano

1 1/2 t black pepper

1 t chili flakes

1 t salt

Directions

For the pitas

Pour the yeast, sugar, and water into a bowl. Whisk together and let sit for 5 minutes.

In a large bowl, pour the flour and salt in and combine. Add the yeast mixture and mix by hand until everything comes together and forms a rough dough. Then knead the dough for 2-3 minutes until it becomes smooth.

Lightly oil a new bowl, and transfer the dough to it. Cover it with plastic wrap and allow it to rise for 1 hour.

Once you’re ready to start forming and baking, put the baking sheet in the over, upside down (or a pizza stone or baking steel if you have one), and preheat the oven to 475 degrees.

Punch the dough down to remove the gas that has built up. Divide the dough into 8 even pieces. Roll each piece into a tight ball, then move to a baking sheet and cover with a damp cloth. Allow the dough balls to rise for 15 minutes.

Lightly flour a work surface, and place a dough ball on it. Using a rolling pin, roll it out into a disc about 8 inches across and 1/2 inch thick. Repeat with all other balls, covering with a damp cloth as you go.

Open the oven door and pull out the rack with the baking sheet or pizza stone. Gently place the disc onto the sheet (if you have a pizza peel, this would be a good time to use that). Close the oven door, and allow it to bake for 1-2 minutes, or until the disc puffs. Open the oven door, and flip the pita and allow it to bake for another 1-2 minutes.

Remove from the oven, and repeat for the rest of the discs.

For the relish and sauce

Combine ingredients and set aside.

For the meat mixture

Add the onions and garlic to a food processor, and pulse until diced fine. Add the remaining ingredients and process until the meat is broken down and almost worked into a paste.

Remove the meat from the food processor, and divide into 6 even balls. Form each ball into an oblong patty. If using skewers, place two through the patties to hold together.

Heat grill. If using gas, preheat to high, then bring it down to medium high for cooking (it should be about 450 degrees).

Oil the grill grate, and spray oil onto the patties. Place the patties on the grill and cook on the first side for 5 minutes (be prepared with a water bottle to stop any flareups). Flip and cook on the other side for 3-4 minutes, until the patties are done through.

Pull the patties off the grill and allow them to rest for 5 minutes. Remove skewers, and slice into bite size pieces.

Assemble gyros and eat.

Part 1 of a very special 2 part series: Potato Salad, because Skippy isn’t going to save us

There are so many things I miss about the TV shows I grew up with. Not in an old man yells at clouds way, but in the silly gimmicks they used to do, whether it be the crossovers between shows (what, Spenser For Hire is on the Love Boat??), the clip compilation show (where the actors reminisce about an event for 45 seconds, they drop in a 5 minute clip of that event, and that’s ad revenue without labor), or the two part episode (where the story line is so important that they just can’t pack it all into one 30 minute episode, so they stretch it over 2 weeks).

What does that have to do with this post? We’re going to spend 2 posts exploring the dishes that come together to make a really great meal.

And why am I treating it as a 2 part series? Umm…I was too lazy to take pictures of the two items separately, and they wouldn’t look good cropped, so it’s a 2 parter now…but rest assured, Skippy is not going to be showing up at the airport to greet Mallory, only to find her with her new boyfriend Scott.

(Yes, I just did Hans Gruber mistaking the season 1 finale of Friends for every episode of Family Ties.)

In part 1 of this series, we’re going to be doing potato salad. Potato salad, like all of the mayo based salads, has a wide range of potential outcomes. Most of the time they’re over-mayoed, which makes them really bland. Occasionally you’ll find some odd ingredients in them, though you don’t find as many variations as you do with chicken salad (grapes, walnuts, Viagra). And usually the potatoes get soft and mushy. As we’ll find out, these are easy to overcome.

First thing first is the potatoes. Go with the regular old russet potatoes; this isn’t a time to get cute with your purple Yukon artisan golds, they’re not going to absorb the seasoning and dressing as well as the humble russet. And you don’t want to be looking at those weird colors in your salad.

Now, the best way to ensure that your potatoes cook evenly to a just tender doneness is to cut them all about the same size. I mean, you can get a ruler and measure and make sure they match exactly…not that I’ve ever done that…

…but they should be around 3/4 inch – 1 inch cubes. Just do your best to keep them uniform if you don’t feel like getting all anal-retentive about it.

Next thing we need to attack is cooking your matchy matchy cubes to cook evenly without turning them into a soggy mess. To do this, you want to start the potatoes in cold water, instead of dumping them straight into boiling water. Boiling water is going to start obliterating the outsides of the cubes before the insides can get cooked, and they’re going to bash against each other and the edges will get all soft and messy. Don’t be soft and messy.

You also want to add a lot of seasonings to the water – sugar, salt, and vinegar. Why do we season the water? The same reason why I’ve said in pasta recipes that you need to make the water taste like the sea OH MY GOD WE’RE DOING A FLASHBACK!!! But seriously, seasoning the water with salt and sugar is going to get them to penetrate the potatoes much better than doing it after boiling. And the vinegar, in addition to the flavoring, is also going to help slow the process of the potato falling apart during cooking, so if you overcook them a little they should still hold together.

Once you’ve got the potatoes boiled, you’ll need to drain them and lay them out on a baking sheet or two, sprinkle them with a little more vinegar, and allow them to cool off. While the potatoes are resting, getting to know the vinegar, absorbing it in the same way that we’re absorbing the likely Shayne/Shaina coupling on the Love Is Blind reunion show, you can start working on the dressing.

Now, there’s nothing saying that you have to follow a specific recipe on the dressing – it’s not like baking, where the entire structure of a loaf of bread crumbles if there’s 1/16th of a tablespoon less of sugar than required. That said, a little over 1/4 cup of mayo per pound of potatoes is a pretty good ratio to get ideal coverage. But hey, if you like it super gloppy, knock yourself out and add all the mayo.

The rest of the additions should add texture (celery, onions), sweetness (sweet pickles), acidity (mustard), and/or deliciousness (hard boiled eggs). Anything you add beyond these should hit one of these characteristics. Usually I joke about things you could add…but you really shouldn’t. Whatever you do add, make sure they’re cut finely – this is a potato salad, not a celery salad, and your choices should reflect that, and will reflect on you as a human being.

Once the potatoes have cooled, you want to mix them and the dressing together. Gently. You’ve spent this much time being very careful to prepare everything perfectly, the last thing you want to do is smash everything together and make sad mashed potato salad.

Be sure to come back next…I don’t know, week, month, millennium…for the finale of this very special post.

Potato Salad

Adapted from Serious Eats

Serves 8

Ingredients

4 pounds russet potatoes, peeled and cut into 3/4 inch cubes

6 T rice wine vinegar

4 T sugar

2 T kosher salt, plus more for seasoning

For the dressing

1 c finely diced celery (about 3 ribs)

1/2 c finely diced red onion (about 1/4 onion)

1/2 c thin sliced green parts of green onions

1/4 c minced parsley

1/4 c minced sweet pickles (sweet pickle relish is a great substitute)

2 T whole grain mustard (Dijon works fine as well)

4 eggs, hard boiled and diced small

1 1/4 c mayonnaise

Directions

In a large saucepan, add 2 quarts of cold water, 2 tablespoons each salt, sugar, and vinegar. Bring to a boil over high heat, then reduce to a simmer. Cook until the potatoes are tender (start testing after 5 minutes, though it will usually take about 10).

Drain the potatoes, then spread evenly onto a baking sheet (or two if needed). Sprinkle 2 tablespoons of vinegar over the potatoes, and allow them to cool to room temperature.

While the potatoes are cooling, prepare the dressing ingredients and combine them into a large bowl.

When the potatoes are cooled, gently fold them into the dressing. Add salt and pepper to taste if needed.

Roasted Brussels Sprouts with Sriracha and Honey, because you can turn a practical joke into something tasty

Let’s get this out of the way right now. Brussels sprouts are total bullshit. It’s a practical joke, played on us by Mother Nature.

People say that god must have been high when he made the panda. Well, he must have been on some serious LSD, while on a mushroom trip laced with some bad fentanyl, when he came up with these.

“Oh, hey, check this out. I made cabbage, and it’s the world’s shittiest vegetable. But, you know, I made it, so it’s awesome, but whatever. What if I made a bunch of baby cabbages and grew them on a tree trunk? Man, that’ll seriously fuck with their heads. Ooh, let me go work on the aardvark designs while I’m on a roll…”

(I like to envision god as The Dude.)

“Whoops, looks like I accidentally labeled them as Brussels sprouts, and not brussel. That’s awesome, now people are going to call them the wrong thing forever! Who’s going to call me on this, oh god you misspelled brussel, you really gotta change it. Haha, you just got turned into a dung beetle, how you like that? Someone get Gary Busey so we can find some more good coke.”

So the stuff is basically garbage. But, it also is good for you, and is probably high in folic acid, or vitamin T, or sodium flunkatate, so you should probably try and eat them so you won’t die an early death.

I watched a video from Not Another Cooking Show, where Stephen cooked Brussels sprouts. He swears by them, and used to make something very similar on his food truck, so I figured he knows how to make them edible.

In order to make these abominations delectable, you’ve got to get some color on them. Which is a nice way of saying you need to burn them a bit. And in order to get the color, you need to maximize surface area. Which means that you need to cut them in half, and into quarters if they’re really big.

(How do you determine what is really big vs. normal? Hell, I don’t know, have them face off in a 64 sprout tournament to determine the biggest one? It’s like porn, you can’t explain it, but you know it when you see it.)

After you’ve cut them up, put them into a bowl and generously – and I mean generously – coat them with olive oil. They do not need to be thinking they’re Michael Phelps swimming the 400 meter IM through the oil, but they do need a good coating. Then hit them with a few pinches of salt and many grinds of pepper. Don’t be shy on the seasonings, they’re masking the evil tastes of the sprouts.

While you get the oven heating, get a sheet tray and dump those sprouts onto it – if it gets too crowded, use two trays, this is not the time to be jamming your food too tightly together. Then – and I cannot stress the importance of this enough – make sure that all of the sprouts are facing cut-side down. You want the flat sides to start getting color as soon as possible.

Once the oven is ready, chuck the sheet in the oven and let it get burning those sprouts for a good 15 minutes. Then pull the sheet out of the oven and take it to a counter to start flipping them.

The next point I cannot stress enough is that you should individually flip each Brussels sprout cut side up. This sounds like a royal pain, and maybe it is. But, this is how you show your food love. It needs to know that you care about it, that you want it to be everything you hope it will.

(Of course, you can just toss them around, or shake the tray a bit and see what happens, but the sprouts will know. Oh, they will know. And when you get that phone call many years from now, and the police tell you that your sprouts got drunk and lit bags of poo on the principal’s doorstep, or they shot up a school, or they started reading Ayn Rand…you’ll know why…)

After you flip them…

…you discover that your oven has some hot spots. But even the lighter ones are still starting to get some color on them. So chuck the tray back in the oven (giving it a 180 turn to account for the hot spots) for another 15 minutes (if they’re looking a little parched, a little more oil won’t hurt).

While they’re getting their second cook, you can make the sauce. I like using sriracha and honey, it’s a pretty simple combination that gets a lot of flavor out of the sprouts. I mix it in the same bowl I tossed the sprouts in, so there’s less cleanup afterwards.

After their second cook, the whole sprout has got some color on it.

From here, you can just shake the pan around a bit to make sure that nothing stuck. Forget about showing them love anymore, they took the car and crashed it, and they didn’t take out the trash, and they keep playing that Spin Doctors song, they deserve their punishment.

Everything from here out is based on your liking. If you think they need some more cooking, throw the tray back in for another 10-15 minutes. If you like them softer, for some stupid reason, take them out now.

Whenever you’ve decided that they’re done, drop them into the bowl with the sauce. Coat them in the sauce, and relish the fact that you have done the unthinkable: you have taken the putrid and made it delicious.

Brussels Sprouts with Sriracha and Honey

Adapted from NOT ANOTHER COOKING SHOW

Serves 4

Ingredients

1 1/2 pounds Brussels sprouts, stems trimmed, dirty or nasty leaves removed, halved (trimmed if large)

1/4 c olive oil

Multiple generous pinches of salt

Several grinds of black pepper

1/4 c Sriracha

2 T honey

Directions

Preheat oven to 450 degrees F.

Place halved sprouts in a large bowl. Add oil, salt, and pepper. Mix well with your hands and ensure that the sprouts are well-coated with oil. Add more if needed.

Pour sprouts onto a sheet pans (if the tray is too crowded, use two pans), and turn all sprouts cut-side down.

Place pan in the oven for 15 minutes.

Remove pan and flip all sprouts to round-side down. Rotate the pan 180 degrees, and return to the oven for 15 minutes.

While the sprouts are cooking, add the Sriracha and honey to the large bowl, Stir to combine. Adjust the seasoning to your taste.

Remove pan from the oven after the 15 minutes have elapsed, and stir and shake the sprouts to keep them from sticking.

Return to the oven for 10-15 minutes, or until the sprouts are browned to your liking.

Remove pan, and add the cooked sprouts to the bowl with sauce. Toss to combine and serve.

Palestinian chicken, because this is way beyond pre-tay, pre-tay good

I have never fully embraced Curb Your Enthusiasm. Which is weird, because I loved Seinfeld, I like warped humor, and they had a character named Marty Funkhouser (rest in power, Bob Einstein). But it just never hit the mark with me.

What did hit the mark, however, was the episode with the Palestinian chicken – and granted even the episode has its own issues and doesn’t hold up as well as you’d like. But the chicken…it’s no joke, this stuff is really great.

(Setting up that this post will not be hijacked by any sort of pro/anti Israel/Palestine discussion, this is food, and if any of you little spazoids try, I know where you live and I’ve seen where you sleep, and I swear to everything holy that your mothers will cry when they see what I do to you.)

What makes it great is that it gets marinated in yogurt and spices for 24 hours. You would think that the yogurt would make the skin soft and flabby, but it’s the complete opposite. It gets crispy and browned, almost blackened. And the yogurt helps tenderize the meat too, because…science…

First thing you need to do is to get yourself a whole chicken. A normal sized one, about 4 pounds or so, not the ginormous ones that would have qualified for small turkeys a few years ago. I highly recommend getting an air chilled one if that’s an option.

One you have your not bio-generated monster chicken, you’re going to spatchcock it. You might remember that we covered this in a previous post, from like forever ago. But, if you haven’t been with the blog before last week, here’s a quick review of how to do it, brought to you by the smooth voice of Chef John.

Now, could you just use a cut up chicken, or random chicken parts, or the crab from The Little Mermaid? Sure, I guess.

Should you?

Spatchcocking it is going to keep everything flat and get maximum browning and minimum time cooking. And you will know that this was once an animal, and it died for you…after someone at a meatpacking plant killed it for you…

For the marinade, you’re just going to mix the yogurt with shallots and a few herbs and spices. The recipe calls for sumac. However, our local market didn’t have any, and I kept getting a 404 error every time I went to sumac-r-us.com, so I subbed in some lemon pepper and it turned out just fine.

Once you’ve got all the marinade mixed together, get yourself a big Ziploc bag, toss the chicken in there, and cover it with your yogurt goodness.

(Awkward pause)

Then rub the yogurt all over the chicken, making sure you cover every inch of the yeah this isn’t making it any better just toss it around in the yogur oh for crying out loud just close the bag and put it into the fridge.

Now that the yogurt bird is resting in the fridge, let’s talk toum. Never heard of toum? Neither had I! It’s essentially an eggless garlic mayo, which you will want to spread on everything you eat for the rest of your life.

Could you just take a jar of mayonnaise and mix in some jarred minced garlic? I guess.

Should you?

Yes, it’s going to be a pain in the ass to crush all those garlic cloves, and the peels are going to be sticky, and your hands are going to reek of garlic, and no one will want to touch you even though that was probably the case before you started crushing garlic anyways but go ahead and use the garlic as an excuse if it makes you feel better. But look at what that’s going to yield you.

And then you’re not going to get to watch it turn into this lovely garlic paste…

…and see it turned into this huge mound of garlic spread goodness.

So, do yourself a favor and take the time to make this yourself. The chicken isn’t going anywhere…and if it does…you have other issues you’re going to need to deal with.

The next day, after your chicken is done soaking in the marinade, pull it out of the fridge. Lay some foil on top of a roasting pan or baking sheet (you do NOT want to be scraping this off the bottom of a pan) and lay your chicken flat over it. Pop it in the oven, and when it’s done let it rest before you cut into it. It’s going to be hotter than hell, and you want all the bird juices to reabsorb into the meat and not fly out of it.

Once your bird is rested, cut off a piece of it, throw it on a plate with some toum, and dig in.

Palestinian Chicken with Toum

from Binging With Babish

Serves 4

Ingredients

1 whole chicken, about 4 pounds

1 cup yogurt

2 shallots, finely diced

Zest of 1 lemon

Juice of 1/2 lemon

1 t sumac (lemon pepper can be substituted)

1/2 t ground cardamom

1 bunch fresh dill, chopped (no dry dill)

1 T olive oil

2 heads garlic, peeled

1 cup canola, or other neutral oil

1/4 c lemon juice

Directions

In a medium bowl, combine the yogurt, shallots, lemon zest, juice of 1/2 lemon, cardamom, sumac, dill, olive oil, salt and pepper.

Spatchcock the chicken, and place it in a gallon sized storage bag.  Pour contents from the yogurt bowl into the bag, remove as much excess air from the bag, and seal.  Rub the yogurt mixture all over the chicken to ensure it is completely coated.

Place the bag in the refrigerator, and allow it to marinate overnight.

The next day, preheat the oven to 450 degrees F.

Place a layer of foil over the bottom of a roasting pan or sheet tray.  Remove chicken from bag, and lay on top of the foil (no need to remove the excess marinade).

Roast chicken for 45-55 minutes.

While the chicken is cooking, peel the garlic cloves and place in the bowl of a food processor.  Start the processor, and pulse until the garlic forms a smooth paste.

Once a paste is formed, slowly drizzle in 1/2 cup of the canola oil.  Stop the processor and allow it to rest for a few seconds.  Then slowly drizzle in the 1/4 cup of lemon juice, and allow to rest for a few seconds.  Slowly drizzle in the remaining oil, until the mixture forms into a smooth paste.

Once chicken is finished cooking, remove from the oven and rest for at least 10 minutes.  Carve chicken and serve with toum.

Matzo Ball Soup, because you need some Jewish soul food in your life

I remember when I was growing up, my family would go over to my great aunt’s house for holiday dinners. And for occasional weekend dinners. And random Friday night gatherings. They threw a lot of events, because at that age I suppose you don’t have much else to do.

Anyways, my grandmother lived right up the hill from my great aunt – literally right up the hill. Their houses were pretty much back to back, and you walk down a 50 foot hill and you’re at the house. So she would bring some food as well. And she made matzo ball soup, with the largest matzo balls I have ever seen. Like, the size of softballs.

And they’d serve them in these average sized bowls, so the balls would engulf the bowl, and there’d be a little bit of soup in it, and a little piece of carrot or celery that wondered why they even bothered to put it in the bowl.

Were they good? Hell if I remember! They were giant balls, what else did you need to know?

Flash forward about 20 years. My friends were having a soup night, and I decided that it was time to take a shot at making my own version of matzo ball soup.. So I did the slightest bit of research, and came to the realization…

…her matzo balls probably sucked.

Let’s step back for a minute, for those of you that aren’t familiar with this goodness. Matzo ball soup is essentially Jewish chicken and dumplings. The balls are pretty close to the same as dumplings, except you use matzo meal instead of flour. And matzo meal is made from ground-up matzos, which are flavorless dry crackers. That doesn’t sound terribly appealing, but neither does flour, and you’re going to make some very good things out of this.

Now, there are two types of matzo balls: floaters and sinkers. Floaters are pillowy, soft, tender balls that will mostly sit on top of the broth and absorb all the flavors of the soup.

Sinkers are for people that have no taste buds, like horrible things, and probably root for Ohio State…I mean, they are flavorless blobs that sink to the bottom of the bowl.

Most likely, my grandmother’s matzo balls were sinkers. I probably learned more about my family with this piece of information than I would get from spending 20 hours on Ancestry.com.

So, because we here on this blog like things that taste good, we’re going to work on making some floaters. Making the batter is pretty easy. You just mix some matzo meal, eggs, seltzer water (the key ingredient to make them floaters), melted butter (if you have some spare schmaltz laying around, this would be the time to use it), salt, and pepper. Be generous with the salt, matzo meal is seriously bland.

Once you’ve got it mixed together (make sure there aren’t any pockets of dry matzo meal just hanging out together), put it in the refrigerator to rest for about 30 minutes or so. This is essential, all the ingredients need to have time to get to know each other, talk about the latest episode of Ted Lasso, debate the merits of Nate making decisions over Coach Beard, stuff like that.

While that’s resting, go get your biggest pot and fill it up with a boatload of chicken broth, and start bringing that to a boil. Definitely splurge for the organic stuff if you can, it does make for a better soup (though if you have some homemade broth, you are not going to find a better purpose for it).

Once your batter is rested and can give you the plusses and minuses of using a 4-4-2 vs. 4-2-3-1 formation, pull it out of the fridge and bring it next to your kitchen sink, along with a plate to place your matzo balls onto. Why near the sink? Because the ball mixture is super sticky, and you’re going to need to wet your hands every few balls so it doesn’t stick to your hands.

You want to make these relatively small, no bigger than a golf ball. They’re going to puff up when they cook, so don’t make them too big. So just grab a little piece, roll it around in your moist hands, say ohhh, I can’t wait to put you in my mouth, acknowledge that that was just weird, and then put the ball on the plate.

By the time you’ve got your balls made, your broth should be at a boil. Drop those balls in one at a time, maybe make a high-pitched scream after each one, saying NOOOO I STILL HAVE SO MUCH TO LIVE FOR!!! Once they’re in, lower the temperature to a simmer. I like keeping the lid on so the top-facing side stays moist – if you do that, make sure you get the temperature pretty low, because it can come to a boil pretty easily.

Now, some people will argue with you and say that the balls should be cooked in water and not broth, because you want to taste the balls separately from the broth. Which, I say, of course you should do that! What hasn’t ever tasted better when cooked in water than in broth? And I get to dirty up another pot? Where do I sign up for this dipshittery?!?!

While the balls are cooking, get yourself one of those rotisserie chickens and shred it up into little bits. I don’t know if it’s the brine/spices they cook them in, or the texture of it, but it really adds something to the dish.

After the balls are done cooking (which you’ve flipped once during their 30 minute bath), get those balls out of there and back onto that plate.

Remember how I said they were going to plump up? Check these fat fuckers out! If I knew how to do cool photoshop stuff I’d be making a How It Started/How It’s Going meme for this!

From here, you’ve got choices. Do you want to add carrots, celery, onions, Ivermectin to your broth? This would be the time to cut some up and get them cooking in the broth. Cut them in small enough pieces that they’ll cook in 10-15 minutes or so – you’ve put enough effort into the soup, you don’t want to wait too much longer to eat it, and no one gives a fuck about the vegetables, so get it done quick. Then drop the shredded chicken in there and cook it just long enough to heat it through and get it to release those sweet spices.

All set now? Load up a bowl with some soup and chicken, drop a few balls in there, and kick back and enjoy. You’ve got good taste, and those sinker lovers can go suck it.

Matzo Ball Soup

Serves 4-6 bowls

Ingredients

1 cup matzo meal

4 large eggs

1/4 cup melted butter or oil

1/4 cup seltzer water

1 teaspoon salt

Several grinds of black pepper

3-4 quarts of organic chicken broth

1 grocery store rotisserie chicken, skinned and shredded

Directions

In a large bowl, beat the eggs until the yolks and whites are combined.

Mix in the matzo meal, melted butter, seltzer water, salt, and pepper. Stir until there are no pockets of dry matzo meal.

Refrigerate the mixture for 30 minutes.

In a large stockpot, add the chicken broth. Bring to a boil.

After 30 minutes, remove the bowl from the refrigerator, and place by a sink. Place a large plate by the bowl.

Wet your hands under cold water, grab a golf ball sized piece of the mixture or smaller, and roll it into a ball shape. Place the ball onto the plate, and repeat.

When the broth reaches a boil, add the matzo balls to the pot one at a time.

Reduce the heat to low, cover the pot, and cook for 15 minutes. Check after a couple minutes to make sure the broth does not boil over.

After 15 minutes, remove the lid, flip the matzo balls, and cook for another 15 minutes.

Remove the balls with a slotted spoon and place on a plate.

Return the broth to a simmer. If desired, add vegetables and cook until tender.

Add shredded chicken to the simmering broth. Simmer until chicken is warmed through.

Return matzo balls back to the pot. Simmer for a minute to reheat the matzo balls.

Serve.

I Won the Encyclopedia of Sandwiches Challenge, because your favorite sandwich sucks

I’m sure most of you saw the “What Sandwich Are You?” meme that was traveling around the internet earlier this week. Which, to me, really wasn’t good enough, because:

  1. I don’t think you should have to restrict yourself to just one sandwich.
  2. Some of these sandwiches need to be put in their place.

So I decided that it was necessary to rank these, 1-40, and make sure these sandwiches know which of them just don’t make the grade.

(I realize that I’m making the sandwiches anthropomorphic characters by shaming them…but that was their decision when they decided to become a sandwich.)

(This list is already somewhat discredited by the fact that the greatest sandwich in the world, muffuletta, is nowhere to be found, but you have to dance with the sandwich list you brung to the dance…)

SANDWICHES THAT DESERVE TO BE HUMANELY DESTROYED

40. Liverwurst

I’m always amazed that there’s the part of the deli section in the grocery store that has all of the “reject meats” (head cheese, olive loaf, liverwurst, etc.). Are they doing this because Big Liverwurst has incriminating photos of the head of the Deli Meat Slicer Union? Is there some sort of Dagwood Bumstead Appreciation Society that comes in during the early morning hours and wipes them out of it? Regardless, this is disgusting and should never be eaten.

39. Cucumber Tea

Has anyone in America not named Boopsy or Snifsy, or aspiring to compete socially with said Boopsy, ever eaten this abomination?

38. Bocadillo

Bread, rubbed with raw tomatoes? Ooh, I want all of the seedy slimy flavor of a tomato, without any of the meat of the tomato, because it gets in the way of the raw slime. Sign me up!

37. Bologna

I used to eat bologna when I was 7, and I mostly attribute it to my mom maybe hating me…at least that’s what came out in therapy…with the nasty aftertaste, no one should be touching this stuff.

36. Veggie & Hummus

Is this a real sandwich? Like, I want to eat crudites and hummus in mass quantities, and I haven’t been invited to a party in months where they would serve them, so I bought a mini tray at the market and shoved them between slices of bread to make it socially acceptable?

35. Jambon Beurre

Ham and salted butter? My god, does it come with a complimentary IV drip to re-hydrate you?

SANDWICHES THAT ARE JUST EXCUSES TO PUT RANDOM VEGETABLES ON BREAD

34. Falafel Pita

Yeah, I know that falafel is not a vegetable, just a vegetarian fritter, and jamming it inside a pita with a few vegetables doesn’t make it any better.

33. Caprese

For people that want a “sophisticated grilled cheese”, but with runny tomato goo in the middle.

(I’m not much on the raw tomato thing, if you can tell.)

32. BLT

Me: I’d like to get a bacon cheeseburger with everything.

Waitress: Great…ooh, but we’re out of burgers…and cheese…and buns…but I could put the rest on some white toast!

Me: What?

(to be continued…)

SANDWICHES FOR PEOPLE THAT DON’T WANT TO PUT ANY THOUGHT INTO IT

31. Turkey club

Waitress: And I could add some sad turkey slices and cut them into quarters and stab each one with a fancy toothpick!

Me: What?

Waitress: I’ll have Mr. Hedberg explain it to you.

30. Ham and Cheese

95% of all sandwich ham falls between slightly below mediocre and just plain mediocre. Except for Boars Head Habanero Ham, that seriously rules. I mean, if that’s all I had to choose from, or my other option was sad turkey, I would probably eat it…but I wouldn’t go there again.

INTERNATIONAL SANDWICHES THAT WILL GET ME IN TROUBLE FOR NOT LIKING

29. Gyro

You can call it lamb, but to me it’s just decent mystery meat in a pita with average creamy cucumber yogurt sauce.

28. Torta

I’ll confess that I probably haven’t had the right tortas, but what I’ve had seems to be just chewy bread with a variety of meat and cheese. Plus, beans on a sandwich? Nuh uh, I make enough of a mess of myself as is.

POSER SANDWICH ALERT!!

27. French Dip

In theory, this should be a pretty good sandwich. Roast beef with roast beef drippings sauce. Two big problems:

  1. 7 times out of 10, the sauce turns out to be super oversalted
  2. Soggy sandwiches are rarely appealing

SANDWICH PEOPLE LOSE THEIR MIND OVER THAT DOES NOTHING FOR ME

26. Po Boy

Again, tomatoes and shredded lettuce are no-nos here, so it’s just fried seafood and mayo sauce and bread. And that’s ok, I’m just good with having those elements separately.

SANDWICH THAT SOUNDS GREAT BUT IS WAY TOO TRICKY TO PUT TOGETHER SUCCESSFULLY

25. Bacon Egg and Cheese

So, you have to, in the space of maybe four minutes, toast your bread, fry adequately crispy bacon, and cook the egg just right. Anything less, and it’s all for nothing. Plus, then you’ve got the issue of eating a sandwich with a runny egg, so most of it is probably fork and knifing it, which is fine, but then you might as well make bacon and eggs with toast.

SANDWICHES THAT ARE JUST BREAD WITH GOOEY STUFF OVER THEM

24. Hot Brown

Taking a couple slices of bread and covering them with turkey and a half gallon of cream sauce does not qualify as a sandwich. Plus, the sauce is usually too salty, but if they put it under a broiler and crisp the top a bit…I don’t hate them for that.

23. Croque Monsieur

I don’t know what Hot Brown is in French, but they might as well call it that instead of Croque Monsieur.

22. Croque Madame

Add an egg to it, and you’ve got French Hot Brown with L’oeufs (oh yeah, Google Translate for the win!)

PERFECTLY PASSABLE SANDWICHES WHEN YOU WANT TO FEEL LIKE A KID

21. PB&J

Even with room temperature peanut butter, I still find it hard to spread it without ripping the bread. But it’s simple and tasty, and works best with the most basic jelly, like Welch’s grape.

Never buy the jars with the peanut butter and jelly in it though, or I will hunt you down.

20. Grilled Cheese

Again, if you use mayonnaise instead of butter to coat the outside of the bread like every hipster tells you to, it’s a hunt you down situation. No, plain white bread, Kraft singles, and lots of salted butter are the only acceptable ingredients.

SANDWICHES THAT CAN GO WRONG VERY EASILY, A LITTLE MAYO CATEGORY

19. Tonkatsu

Mayo isn’t necessarily a key ingredient here, but since it’s an ingredient I technically have to include it in the mayo category…because we’re all about following rules here. Anyways, tonkatsu is a pretty simple sandwich. And when you have a simple sandwich, you can’t miss on a single element. That said, even a bad fried pork cutlet is still pretty decent.

SANDWICHES THAT CAN GO WRONG VERY EASILY, MORE MAYO CATEGORY

18. Lobster Roll

The good thing about this sandwich: I never realized you could split a hot dog bun down the middle. Grilling it with butter is also a wonderful thing.

The bad things about this sandwich: if you don’t live in New England, you’re either getting an all-filler/no-thriller salad, or you’re paying $20 for a smallish bun.

16-17. Egg Salad/Chicken Salad

This is a dangerous group, because it’s almost entirely dependent on the mayo content, and whether the maker of the sandwich understands that mayo has no flavor content and needs to be well-seasoned. Also, some chicken salad has grapes and those people should be shot. That said, when done well, quite tasty.

15. Tuna Salad

Some of the same issues with the above salads, except that I find that people tend to get less cute with tuna than they do with chicken, so the quality is usually better. And when you add cheese and griddle it in butter…this needs to be on more menus.

SANDWICHES WHERE IT STARTS GETTING HARDER TO MAKE FUN OF THEM, BUT STILL AREN’T ELITE

14. Cheesesteak

The only reason this isn’t higher is because very few places do this the right way, actually cooking it on a griddle and instead just sauteing everything. Which is still pretty good. Also, any sandwich that people legitimately use Cheez Whiz on can’t be considered a top shelf sandwich.

13. Roast Beef

It’s like the ham and cheese, except you decided to make a sandwich that tells someone you love them, instead of one that you give them before you tell them that you’re writing them out of your will.

12. Bahn Mi

As has been explored previously, not everyone is a fan of this sandwich. But when it’s done right, with well cooked meats and pickled vegetables, they are fantastic.

Also, some of them have liver pate on them, so no elite status for you.

11. Monte Cristo

Some of this is a nostalgia play. I spent seven miserable weeks many years ago waiting tables at Bennigan’s. The only good memory of that place was that they had a monstrously beautiful Monte Cristo. Deep fried french toast stuffed with turkey & ham (both meats that I’ve maligned earlier, but they weren’t fried, so fuck ’em) and cheese was just a beautiful thing. But I won’t hate people that say the french toast sandwich thing isn’t for them.

10. Meatball

This is basically an excuse to eat a lot of meatballs and cheese with bread. It’s a good excuse.

9. Thanksgiving

Whomever decided to take all of the Thanksgiving leftovers and throw them between two slices of bread was a fucking genius. Done right, there’s taste and texture balance that makes you glad you spent three days cooking for family. And Monica Geller’s addition of the moistmaker is next level. The only weird thing is that, if you add stuffing/dressing, you’re eating bread between bread.

Also, the moistmaker got really dark…

8. Bagel & Lox

True story: when I was a kid, I used to use butter instead of cream cheese as my add-on for my bagel & lox sandwich. How I did not die form sodium overdose is beyond me. Nowadays, if you can find me a really good bagel (not the easiest thing to do in Texas), I’m sure I could source some quality lox and be a very, very happy boy. The above also neglects to mention the capers, which in my mind are a necessity. Oh, also, fuck that tomato.

SANDWICHES THAT BELONG IN ANOTHER STRATOSPHERE

7. Patty Melt

I was honestly surprised when I put this together, because I can’t remember the last time I’ve had one of these. Mostly because it’s rarely on menus, which seems ridiculous to me, because it’s not like it’s too difficult to make. Cook a burger, grill some onions, slap it in between two slices of bread and griddle it in a mountain of butter, is that a bad thing?

6. Italian Sub

To be fair, most Italian subs are a series of somewhat indistinguishable salty meats, piled onto a sub roll. I don’t see what’s wrong with that. Plus, you rarely get a scrawny Italian sub, probably because there’s usually a minimum of three meats on one of them. My go-to order when I go to a sub shop.

5. Pulled Pork

The only negative about this sandwich is, at some point during the consumption, it morphs from a pulled pork sandwich into a pulled pork plate. I’ve never seen anyone eating the entire sandwich as a sandwich. It’s still pretty awesome though.

4. Fried Chicken

Five years ago, I wouldn’t have thought much of one of these. But then hot chicken became a huge thing, and everyone started to up their fried chicken game, and then Popeye’s entered the chat and made everyone lose their shit, and that’s made us all better for it.

3. Italian Beef

The last one time I went to Chicago, I went straight to Portillo’s for a big ass Italian beef sandwich. If you haven’t had one of their roasted and slices beef sandwiches with a ton of hot giardiniera, and dipped into a pot of beef jus (the only timeI will violate my anti-soggy sandwich stance), you have not lived.

(And I’m sure some hipster will be sending me emails, telling me how Portillo’s is mass produced crap and there’s some hole in the wall that’s only open on prime number days between 3:17 and 7:13 that does it way better. To which I would say, great, and that means it’s even better than I thought it would be!)

2. Reuben

At what point in American history has anyone ordered a Reuben, eaten it, and said, I wish I’d ordered something else? It hasn’t. Ever. No one has ever walked away from one disappointed. Corned beef and sauerkraut and Swiss cheese (which makes it so un-kosher yet every Jewish deli loves to make these)…how could anyone ever hate these? It would be the king of all sandwiches…except for…

  1. The Cuban Sandwich

I had never heard of this gem until maybe 15 years ago- I blame Castro for that. Regardless, of all the breads that have a nationality in front of it, Cuban bread reigns supreme. And not a lot of places carry this, because, frankly, it’s not one that just anyone can make. You have to roast the pork well, source yourself some good bread, find decent ham but whatever with that, and be willing to take up a decent amount of griddle space to butter and press the shit out of that thing. Gimme all the Cubans you can get me.